Set Up TikTok Pixel on Shopify Easily: No Coding Skills Needed
Setting up TikTok Pixel on Shopify is a simple yet powerful way to optimize your advertising efforts on TikTok. When installed on the website, it provides great insight into user activity within the store by tracking user navigation from the adverts on their other websites, to browsing products, adding items to the cart, and fulfilling paying for an order.
In this article, I’ll show you exactly how to set it up, step by step, so you can start making the most of your TikTok campaigns.
Already familiar with TikTok Pixel? Skip ahead to the installation methods on Shopify.
Why Use TikTok Pixel with Shopify?
The installation of the TikTok Pixel on Shopify is very simple, and the process is completed without ever having to go near the website code. Check out how it can crank up your performance:
Easy Implementation
Installing TikTok Pixel on Shopify is easy. The enhancement of ad performance will be done with just the click of a button to gain cutting-edge insights. This means you can grab hold of everything technical and immediately start investing money into capturing relevant metrics for your advertising.
Streamlined Installation Process
Follow these streamlined steps to create and install your Shopify TikTok Pixel. This process is designed so that it will be user-friendly, thus, you can set everything on your own without having any expertise. Immediately after the installation, the tracking of relevant customer interactions can begin to give you real-time data.
Customizable Event Tracking
For standard events, you can choose which actions to track with your TikTok Pixel directly in the channel’s Analytics settings on Shopify.
This allows you to concentrate on certain user actions that most strongly correlate to your business objectives, thus ensuring that your collection of data is as relevant as possible.
Things to Prepare Before Installing TikTok Pixel on Shopify
Before digging deep into installing TikTok Pixel on your Shopify store, it's better to get a handful of things ready. Preparation will allow you to set up easily and will reduce unnecessary back-and-forth later on.
1. A TikTok For Business Account:
You’ll need a TikTok For Business account to create and manage your TikTok Pixel. If you don’t have one yet, you can sign up.
2. TikTok Ads Manager Access:
This is where you’ll create your pixel and monitor performance. Make sure your TikTok account is linked to Ads Manager and that you have the necessary permissions.
3. Shopify Admin Access:
You’ll need full admin rights to your Shopify store so you can install the pixel, either through an app or by editing your store’s code (if going the manual route).
4. Business Center Account (optional but recommended):
If you’re managing multiple assets like Pixel, Catalog, or permissions for a team, setting up a TikTok Business Center account helps keep everything organized.
Supported Events on Shopify
The TikTok Pixel for Shopify comes with a range of standard tracking events designed to help merchants analyze ad performance and fine-tune their campaigns. Here’s an overview of the events currently supported:
| Event | What It Tracks |
|---|---|
| View Content | Triggered when a visitor views a product or specific page on your store. |
| Add to Cart | Fires when a shopper adds an item to their cart. |
| Complete Payment | Captures when a customer completes their purchase. |
| Initiate Checkout | Happens when someone starts the checkout process. |
| Add Payment Info | Triggered when payment details are entered during checkout. |
| Search | Tracks when a user performs a search on your store. |
| Add to Wishlist | Fires when a visitor saves a product to their wishlist. |
| Complete Registration | Captures when a user signs up—such as creating an account. |
| Subscribe | Tracks when a user subscribes to your site, including for content or paid plans. |
How to Add TikTok Pixel to Shopify?
Three principal methods are used to add TikTok to the Shopify store. They will be discussed one by one to allow you to choose the way best suited for you.
Method 1: Set up Manually
Step 1: Go to TikTok Ads Manager and enter your credentials for TikTok for Business. If you do not possess a TikTok for Business account, then you will set up one first.
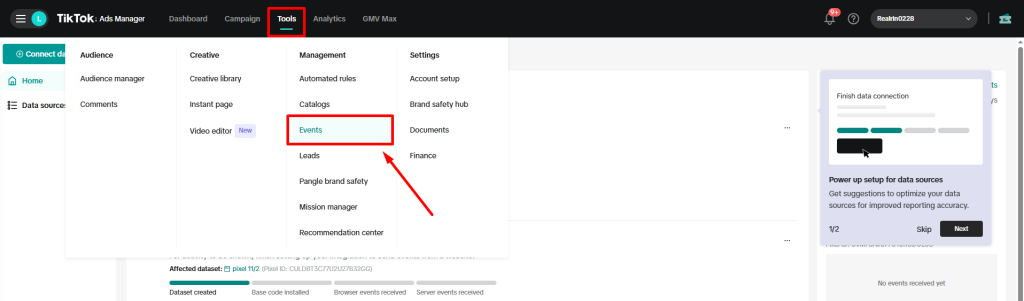
Step 2: Go to Tools > Events > Web Events, and click Connect Data Source. Choose Web, type in your Shopify URL, and Manual Setup.
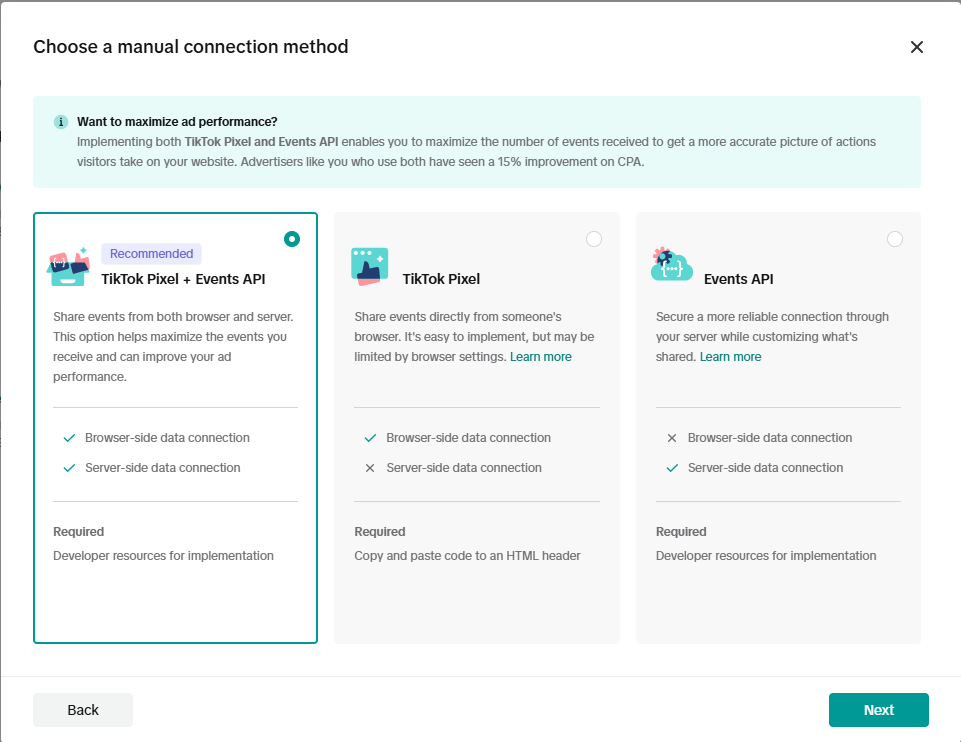
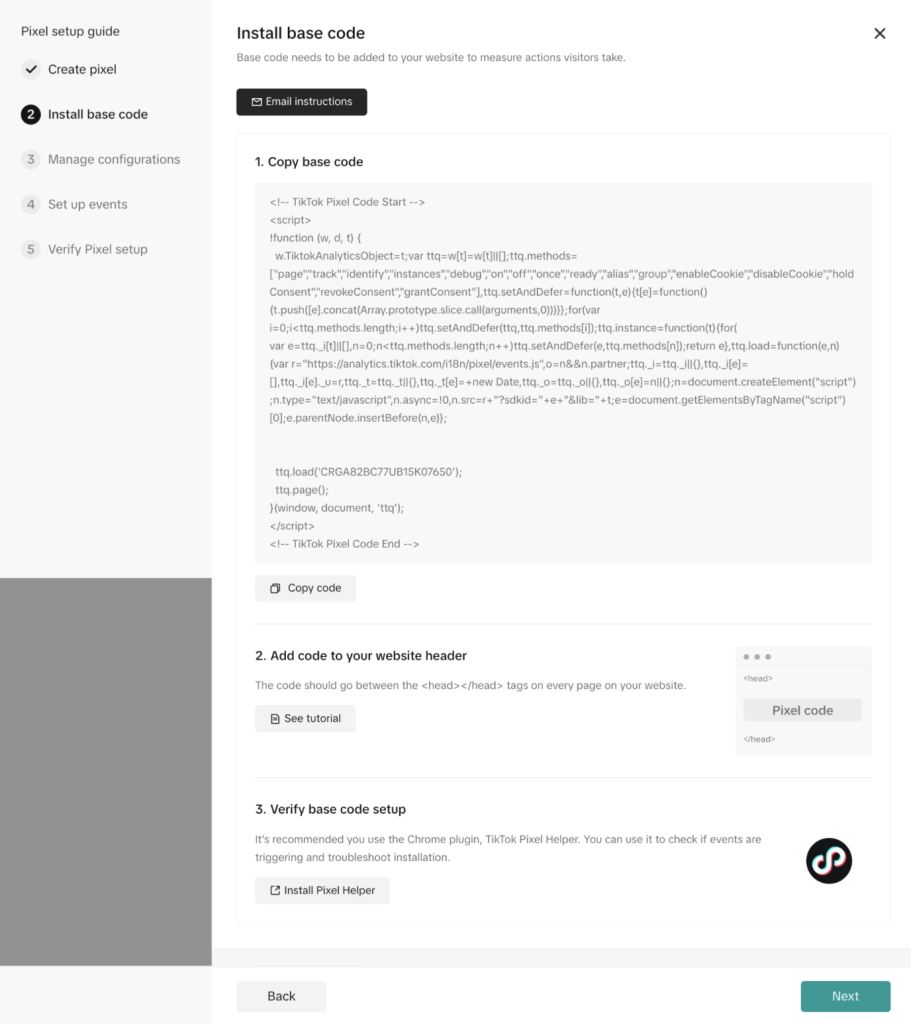
Step 3: Select Manual Connection Method, give your Pixel a name, and click Create. The code should then be displayed for you; click Copy Code to save it in your clipboard.
Step 4: In Shopify, navigate to Online Store > Themes > Actions > Edit Code. Under theme.liquid, insert the code just above the </head> tag, and click Save.
Step 5: Under Settings, open the Checkout and paste the same Pixel code into the Additional Scripts box on the Order Status Page. Make sure to save the changes.
Step 6: Check TikTok Pixel Helper on your Chrome, or by using Test Events in Ads Manager, if your Pixel is installed and firing.
Method 2: Use TikTok Sales Channel App
Step 1: Begin by accessing your Shopify admin dashboard.
Step 2: Open the Sales Channel section and click TikTok. You will be redirected to the page of TikTok integration.
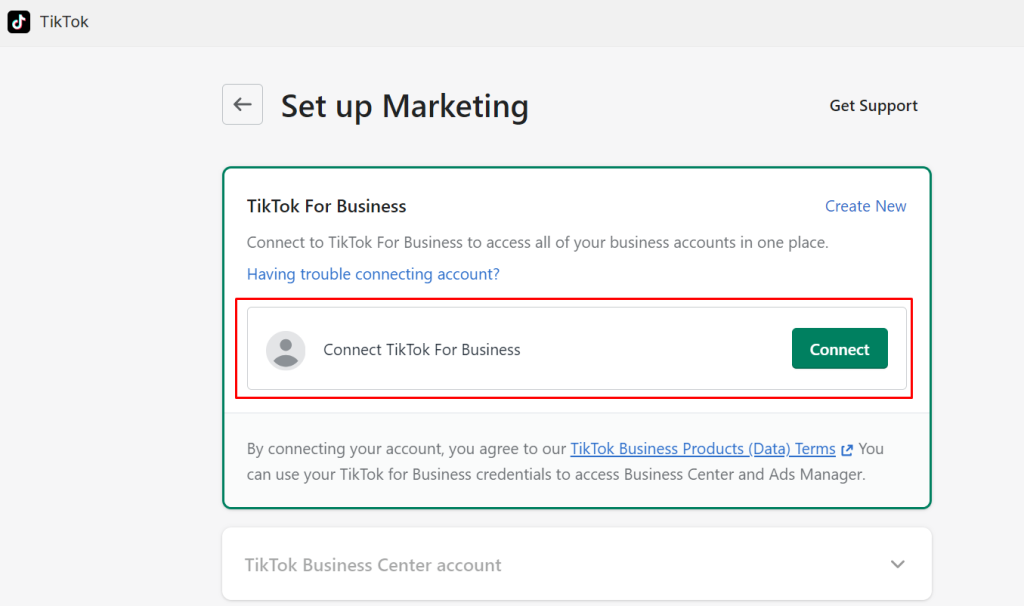
Step 3: Connect your TikTok for Business account or create one.
- TikTok for Business Account: This allows centralized access to all your business-related accounts and features in one place.
- Business Center Account: Use this to manage non-advertisement assets such as Pixel, Catalog, permissions, and payment setups, simplifying overall business operations.
- TikTok Ads Manager: Here’s where you’ll handle all your advertising activities, including creating and managing TikTok ad campaigns.
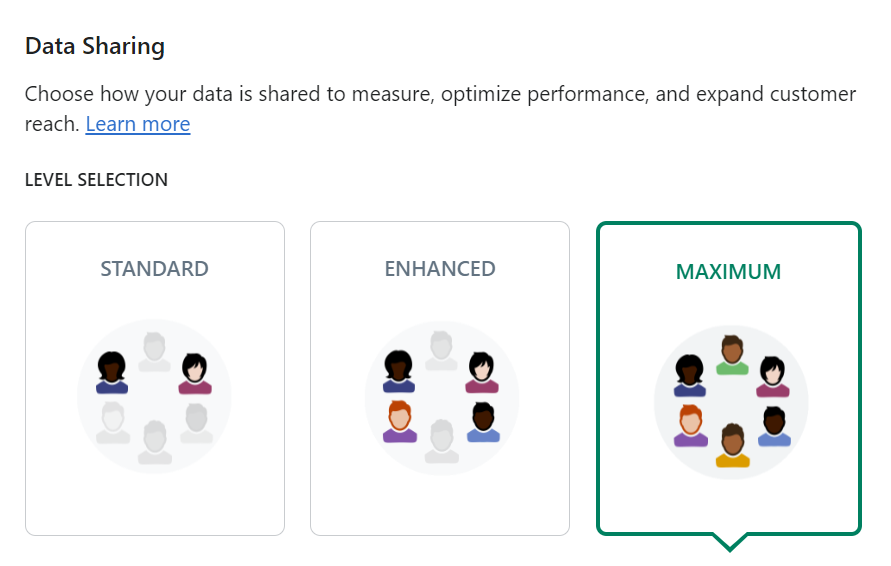
Step 4: Choose how much data you would prefer to share by selecting Standard, Enhanced, or Maximum.
Step 5: Click on “Create Pixel” for new setup, install with the guidance, in case you already have a pixel selected from the dropdown list to attach with your Shopify store.
Step 6: Click on “Set Up”, enter your business location, and other needed information in the ‘Company Information’ section.
Step 7: Review all information and hit the “Confirm” button to finish the integration.

Method 3: Use Dedicated Shopify Apps for TikTok Pixel
If you consider that manual ways of doing TikTok Pixel integration is a little too complex or tricky, you should know that a more user-friendly solution is available: Shopify apps offer a simple method of easily putting in TikTok Pixels in your store without the technical hassle.
One standout app is TikTok Multi Pixels from Omega. This app lets you manage and automatically add multiple TikTok Pixels to your store, no need to copy and paste pixel codes manually.
It also supports automatic product catalog synchronization every hour, keeping your product data fresh and ready to run effective Sales ads. Plus, it tracks key events through the TikTok Event API to help optimize your campaigns and boost conversions.
💡Not sure which setup is right for you? This quick side-by-side comparison will help you figure out the best fit for your store:
| Method | Ease of Setup | Customization | Pixel Support | Best For |
|---|---|---|---|---|
| Manual Setup | 😐 Medium | ✅ Full control | Add multiple pixels manually, one by one | Developers or those with tech skills |
| TikTok Sales Channel App | 😀 Easy | 🚫 Limited | Only supports 1 pixel, no Conversion API | Beginners who want official support |
| Shopify Apps (e.g. Omega) | 😎 Super Easy | ✅ Flexible + automatic | Unlimited pixels, added automatically with Conversion API | Merchants who want speed, multi-pixel, and error-free tracking |
For most merchants, using a Shopify app like TikTok Multi Pixels by Omega offers the fastest, most flexible, and low-maintenance setup, especially when managing multiple pixels or scaling campaigns.
How to Verify Shopify TikTok Pixel Setup
Verifying the installation of the TikTok Pixel on your Shopify store ensures all is in order. It will help you be sure that the pixel is tracking events correctly, and therefore you can optimize your ad campaigns without any hesitation.
Here are some ways to check your TikTok Pixel setup status:
1. Use the TikTok Pixel Helper Extension
Install the TikTok Pixel Helper Chrome extension. Once added, visit your Shopify store and the extension will automatically detect whether a TikTok Pixel is installed and which events are firing.
2. Check in TikTok Ads Manager
Go to your TikTok Ads Manager > Assets > Events. Find your pixel in the list and look at the status. If it’s marked as “Active” and event data is being received, your setup is working.
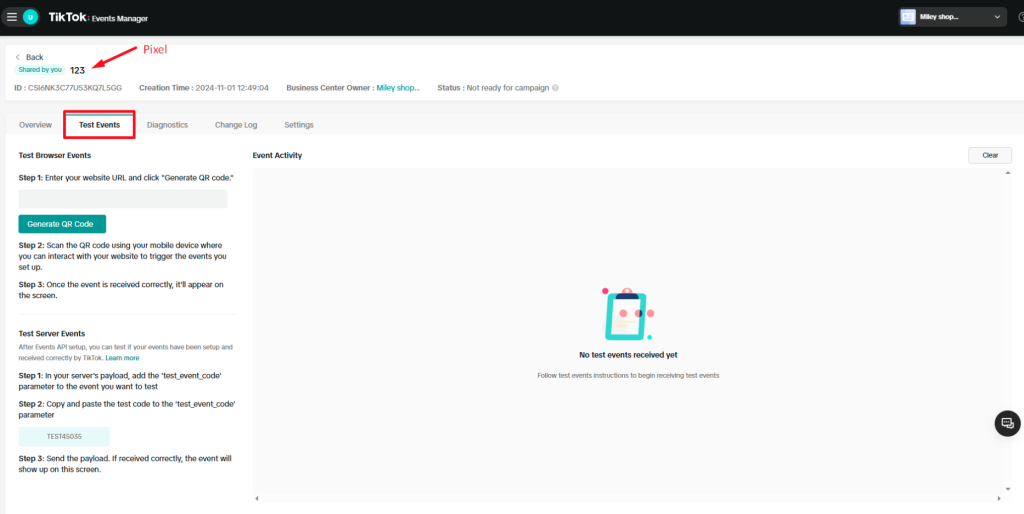
3. Run Test Events
Go to the Test Events section of your TikTok Pixel.
There, you can simulate actions like viewing a product page or adding to cart, to check if the right events are firing correctly.
Best Practices to Optimize TikTok Ads for Shopify Stores
Here are some applicable ways to sharpen performance in your TikTok advertisements while fully being able to use what your pixel can track:
1. Map out campaign objectives
You need to outline what success looks like with the campaign, whether your aim is brand awareness or direct conversions. This will help in guiding ad creative, targeting, and event tracking setup.
For applicable campaign objectives, determine which best aligns with the direction your store is currently at in its growth phase - TikTok Ads Manager is quite flexible this way. Early goal setting helps direct the overall focus of the advertising strategy.
2. Use data-based custom audiences
Retargeting individuals who browsed, added to the cart, or ordered with pixel data is thus part of warm audiences compared to cold traffic. The “comparably” cold traffic conversion is generally better.
An audience can, however, also be created of lookalike customers based on those high-value buyers. TikTok's work would then be to find such people with behavior and interests alike.
3. Optimize for mobile-first engagement
Since it is a full-screen experience scrolled speedily from one end to another, your videos ought to be short and straight to the point, with a hook within 3 seconds.
Use native-style visuals with music, captions, or user-generated content to build trust and boost watch time. Authenticity performs better than polish here.
4. Capture meaningful with your TikTok pixel
In most cases, custom and dynamic events are defaulted to the specific type of business. It may be checked, or added to a cart, and in specific cases subscriptions. But what really matters is tracking the events that are relevant to your business. The more accurate the data, the better your ad optimization and campaign performance over time.
For an easier setup, the TikTok Multi Pixels app by Omega helps you add multiple TikTok Pixels without the hassle. It also lets you create TikTok campaigns and track ad performance directly inside the app. Total sales are tracked effectively, with a clear view of each order journey from ad to purchase.
5. A/B test everything and scale what works
Try different combinations of creatives, audiences, placements, and pixels, and see what will yield the best results. What may work for one brand might completely flop for another.
Use TikTok Ads Manager's split-testing tools and keep an eye on vital metrics such as ROAS and CTR. Scale up the winners and discard the rest without second thoughts.
FAQs
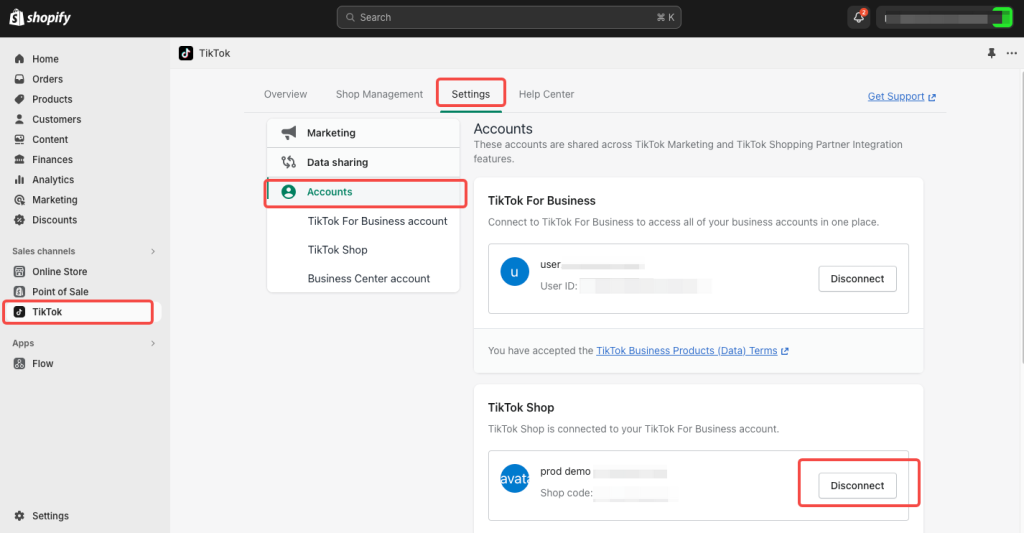
How to disconnect your Shopify store from TikTok?
To remove the TikTok sales channel from your Shopify store, sign in to your Shopify admin, head over to “Apps & Sales Channels”, locate the TikTok integration, and select “Disconnect” to complete the process.
When does TikTok Pixel start collecting data?
Usually, data starts appearing within a few hours after the installation, but in some cases, it might take up to 24 hours.
Can I track specific product performance with TikTok Pixel?
Yes! The pixel can track activities like product views, add to cart, and purchases, giving you insight into how each product performs via TikTok ads.
If you’re using the Omega TikTok Multi Pixels, it supports tracking not only specific products but also specific collections, making it easier to analyze performance at both levels.
Use this in conjunction with reports from TikTok Ads Manager for in-depth analysis.
Can one activate more than one TikTok pixel for their Shopify store?
Yes! It is suggested that those who intend to run different advertising campaigns or have different markets use apps like TikTok Multi Pixels by Omega, which will allow concurrent installation and management of several pixels without conflict.
Conclusion
Setting the TikTok Pixel on Shopify integration is a must whether you are new to the TikTok ads or want to scale your campaigns. It allows you to track customer behavior, optimize conversions, and give useful insight into the performance of your advertisement.
Whatever setup option works best for your scenario, from manual installation to the use of apps, TikTok has it all!
💡Read More: How to Run TikTok Ads for Shopify & Turn Scrolls Into Sales
![How to Connect Wix to TikTok Shop: Step-by-Step Guide [2025]](https://twoowls.io/wp-content/uploads/2025/09/Connect-Wix-to-TikTok-Shop.jpg)
How to Connect Wix to TikTok Shop: Step-by-Step Guide [2025]

Top 10 Best Advertising Apps for Shopify That Actually Work
TikTok Catalog Ads: A Quick Guide for Shopify Merchants

How to Run TikTok Ads for Shopify & Turn Scrolls Into Sales
How to Connect Wix to TikTok Shop: Step-by-Step Guide [2025]
Top 10 Best Advertising Apps for Shopify That Actually Work
TikTok Catalog Ads: A Quick Guide for Shopify Merchants
How to Run TikTok Ads for Shopify & Turn Scrolls Into Sales

Is TikTok Events API Better Than Pixel? Here’s the Truth
How to Connect Wix to TikTok Shop: Step-by-Step Guide [2025]
Top 10 Best Advertising Apps for Shopify That Actually Work
TikTok Catalog Ads: A Quick Guide for Shopify Merchants
How to Run TikTok Ads for Shopify & Turn Scrolls Into Sales