How to Set Up Shopify Google Ads Tracking the Easy Way
Running Google Ads for your Shopify store is a smart way to drive traffic and boost sales. But without proper conversion tracking, you’re basically flying blind.
You might be getting clicks, but are they turning into purchases? Which campaigns bring in the most value? And are you feeding Google the data it needs to optimize your ads effectively?
In this guide, we’ll break down how to set up Google Ads conversion tracking on Shopify the right way so you can track what matters, improve ROAS, and grow with confidence.
What is Google Ads Conversion Tracking?
Google Ads conversion tracking is a tool that helps you understand what happens after a customer interacts with your ad. Did they view a product? Add something to their cart? Complete a purchase? With proper tracking, you’ll be able to answer those questions clearly.
The conversion-tracking mechanism works by placing a small snippet of code called a conversion tag on your store. Whenever someone clicks your ad, performs a required action on your website, Google records it as a conversion. The collected data flows directly into your Google Ads account and serves as the input for several optimization tools such as Smart Bidding, audience targeting, and performance reporting.
In general, for Shopify, conversion tracking has greater importance because:
- Your ad budget is on the line with every click.
- You want to measure real sales, not just traffic.
- You need to give Google accurate signals so it can help you reach better customers at the right time.
Why You Need Accurate Conversion Tracking on Shopify
If you’re running Google Ads without proper conversion tracking, you’re not just missing data, you’re missing opportunities. Shopify may give you basic reports, but they don’t show what’s really driving revenue. That’s where accurate conversion tracking makes all the difference.
- Send better signals to Google: Google’s Smart Bidding relies on clean, reliable data. Without clear conversion signals, it can’t optimize your bids, placements, or audiences effectively.
- Focus on actions that actually convert: Not every click means revenue. Tracking key events like purchases and checkouts helps Google prioritize users who are more likely to buy, not just browse.
- Maximize your return on ad spend (ROAS): When you can measure which campaigns and keywords drive real sales, you can double down on what works and stop wasting budget on what doesn’t.
Common Ways to Set Up Google Ads Tracking on Shopify
There are several ways to implement Google Ads conversion tracking on your Shopify store. Depending on your technical experience, the complexity of your tracking setup, and how much control you want, merchants usually choose one of these three options:
- Manual setup using Google Ads tag or Google Tag Manager (GTM)
- Shopify’s native Google & YouTube app
- A dedicated tracking app like Trakpilot
Let’s take a closer look at each method:
1. Manual Setup Using Google Ads Tag or Google Tag Manager
This is the most direct method and also the most technical. It involves creating conversion actions in your Google Ads account and manually inserting the tracking code (either global site tag or GTM container) into your Shopify theme files.
While this gives you full control over your tracking, it comes with risks. A minor error in code placement can break your tags, and future theme updates might override your changes. Debugging and maintenance also require familiarity with tools like Tag Assistant or Google Tag Manager’s preview mode.
Best for: Advanced users or developers who want granular control and are comfortable working with code.
2. Using a Conversion Tracking App from the Shopify App Store
Tracking apps present a more flexible and user-friendly way to coordinate conversion tracking without delving into theme files or GTM. Such apps normally come with built-in event tracking like Add to Cart, Checkout Started, Purchase, etc., and enhanced conversion support.
Most apps, like Trakpilot, handle data mapping, real-time analytics, and syncing with your Google Ads account, making setup quick and low-maintenance. This is an ideal option if you want accurate tracking without relying on technical resources.
Best for: Merchants who want a more complete, hands-off tracking experience with minimal setup.
Each method comes with its own pros and cons, some give you more control, while others save you time and effort. To help you decide which setup is right for your store, here’s a quick comparison:
| Method | Technical Skill Needed | Supports Enhanced Conversions | Setup Time | Flexibility | Best For |
|---|---|---|---|---|---|
| Manual Setup (Google Tag / GTM) | High | Yes (with custom config) | Long | Very High | Developers or tech-savvy users |
| Shopify Google & YouTube App | Low | Limited / No | Short | Low | Beginners with simple needs |
| Tracking App (e.g., Trakpilot) | Low | Yes (built-in) | Very Short | High | Non-tech users, agencies, SMBs |
How to Set Up Google Ads Tracking on Shopify with Trakpilot (No Tech Skills Needed)
If the manual setup sounds too technical, that’s understandable. You might also just be looking for a faster, more reliable way to track conversions, and Trakpilot could be the solution for you.
Trakpilot is a Shopify app built to simplify Google Ads conversion tracking. Instead of dealing with code, GTM containers, or editing theme files, you can handle everything through a clean, guided interface. No technical setup required. No missed events. No guesswork.
Here’s how to set it up in just a few clicks:
Step 1: Select your Google Ads account from the dropdown in the Trakpilot dashboard.
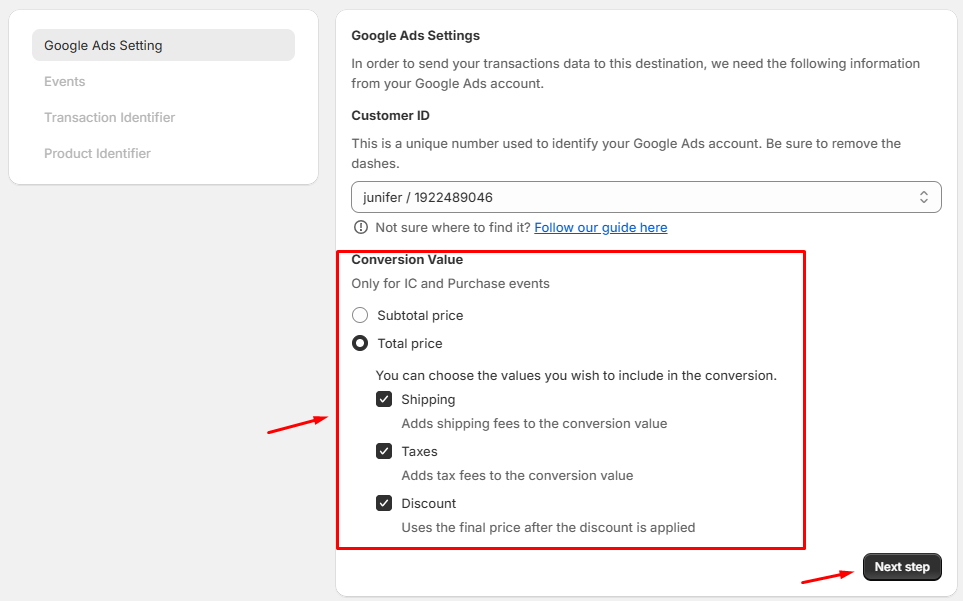
Step 2: Decide how Trakpilot calculates the value of each conversion: subtotal, total price, with or without shipping, taxes, or discounts.
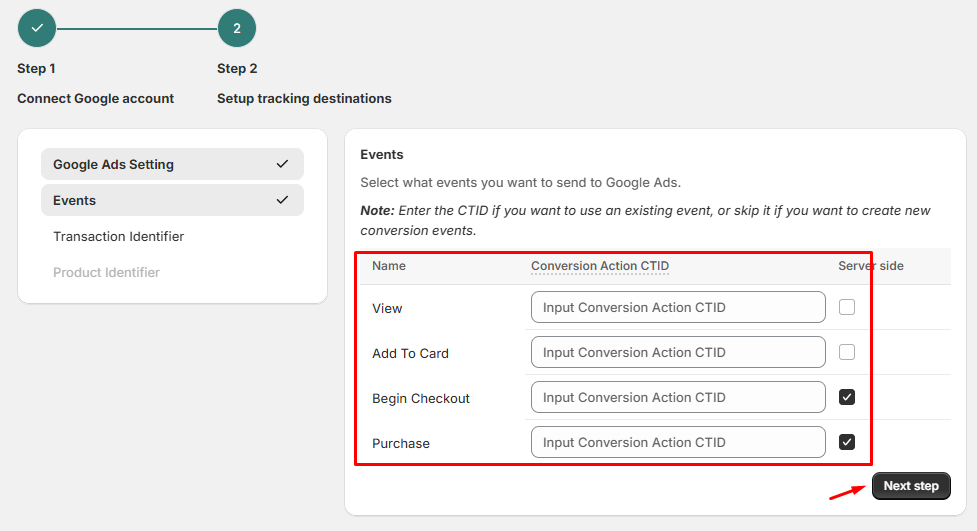
Step 3: Pick the events you want to track, like Add to Cart or Purchase. Trakpilot can auto-create them or let you input existing Conversion IDs.
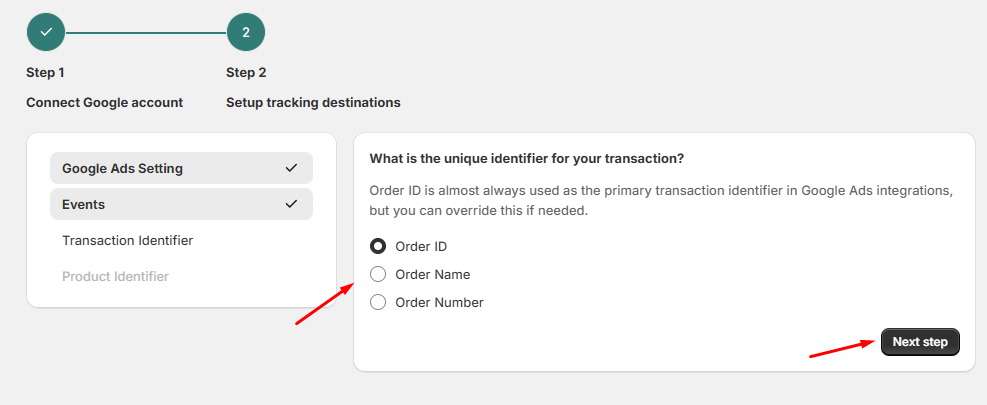
Step 4: Choose how Trakpilot tracks order ID (e.g., name or number) and product ID (product or variant).
Step 5: Click Done. Your tracking setup is live and ready to send data to Google Ads.
On top of that, Trakpilot offers a real-time analytics dashboard so you can instantly monitor which events are being tracked and how your campaigns are performing.
Why merchants choose Trakpilot:
- Fast and code-free setup: No need for developers or GTM experience.
- Sends complete customer data: Supports enhanced conversions for better Google Ads optimization.
- Reduces tracking errors: Works reliably even after theme updates or app changes.
- Saves time: Get set up once and let the app handle the rest.
- Built for scale: Perfect for merchants, non-tech users, and agencies managing multiple Shopify stores.
How to Set Up Google Ads Conversion Tracking on Shopify Manually (Step-by-Step)
⚠️ Note: This is a manual setup method that requires editing theme code or working with Google Tag Manager. It may not be suitable for merchants who are unfamiliar with technical implementation.
If you want to handle conversion tracking manually, this step-by-step guide will help. It gives you full control over your setup and helps you understand how the tracking code actually works.
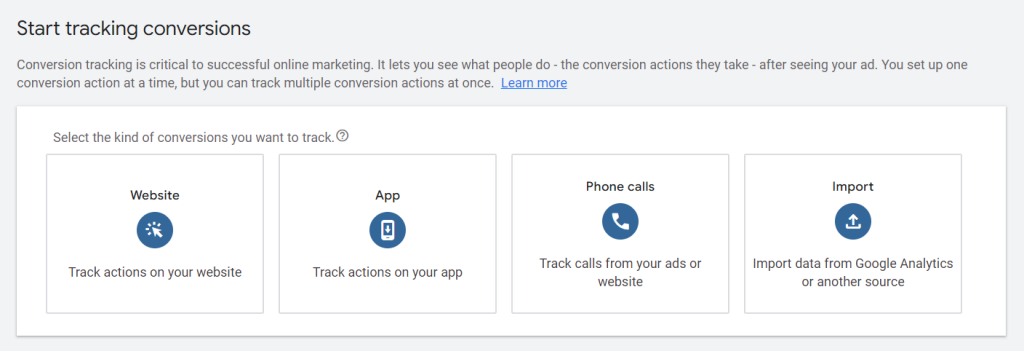
Step 1: Create a Conversion Action in Google Ads
First, go to your Google Ads dashboard and follow these steps:
1. Navigate to Tools & Settings > Conversions.
2. Click New conversion action.
3. Choose Website as the conversion source.
4. Enter your Shopify domain and scan the site.
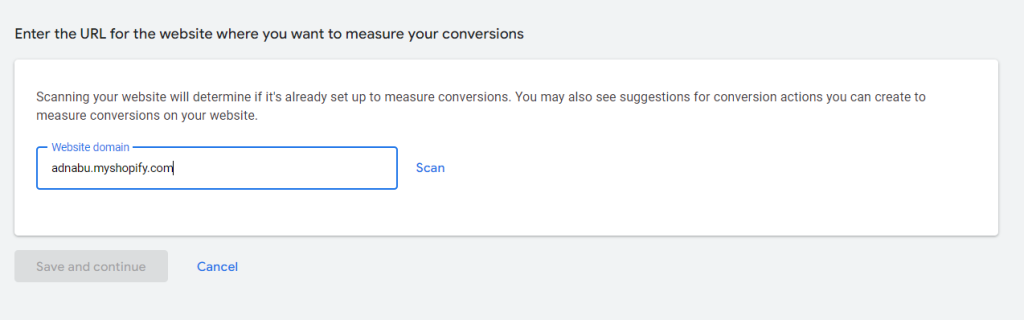
5. Select a goal (e.g., Purchase, Add to Cart, Begin Checkout).
6. Choose how you want to install the tag: manually or via GTM.
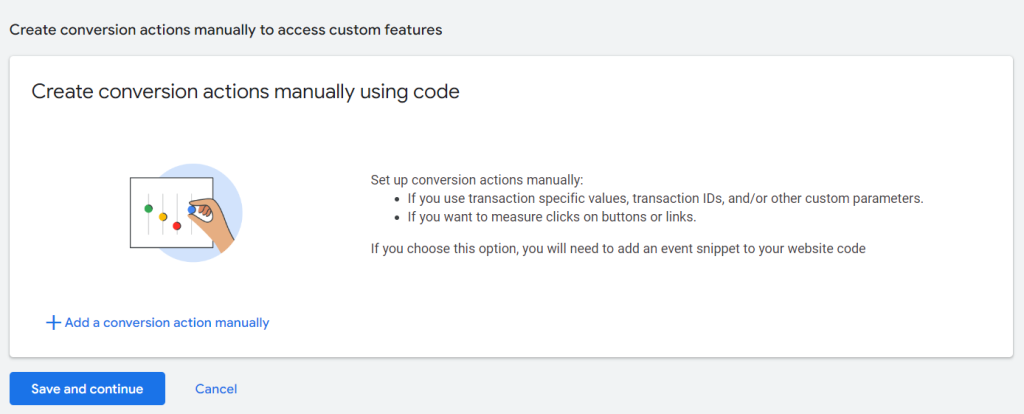
Set values (like currency or order value) if needed, then save the action. You’ll now be given the code snippet (tag) that needs to be added to your store.
Step 2: Add the Conversion Tag to Your Shopify Store
There are two ways to do this:
Option A: Add it manually to your theme:
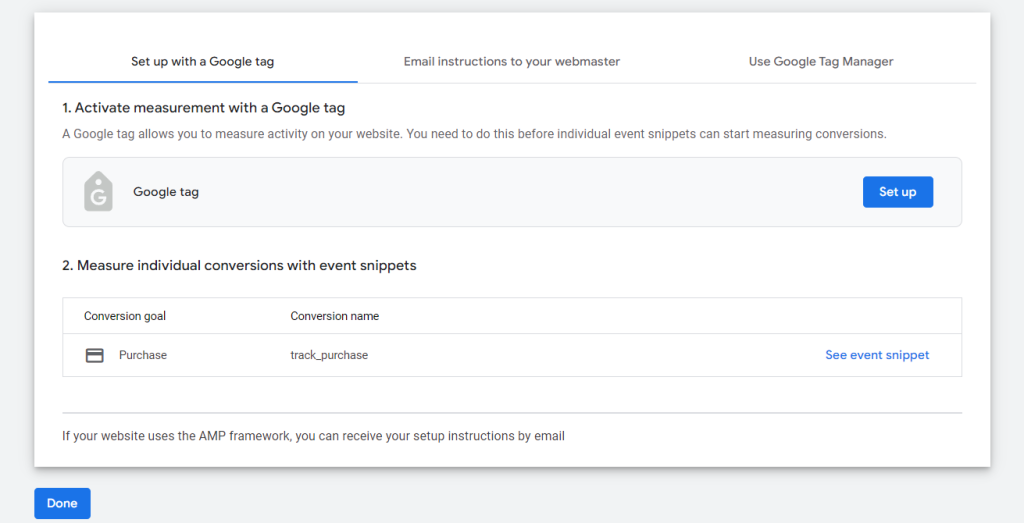
Go to Online Store > Themes > Edit code, and paste the global site tag (gtag.js) in your theme.liquid file right before the </head> tag.
Then, place the event snippet on the Thank You page or specific template file related to the conversion action.
Option B: Use Google Tag Manager (GTM):
If you prefer a cleaner setup, create a tag in GTM with the conversion ID and label provided by Google Ads. Set a trigger for the page or event you want to track, then install GTM on your Shopify store using the container snippet.
Step 3: Test Your Setup with Tag Assistant
Once everything’s installed, use the Google Tag Assistant extension or Chrome’s Developer Tools to check if the tag is firing correctly.
Visit the page where your conversion should trigger (e.g., order confirmation), and look for your conversion ID and event. If the tag doesn’t show, revisit your code placement or GTM configuration.
Step 4: Enable Enhanced Conversions (Optional but Recommended)
Enhanced Conversions allow Google to receive hashed first-party customer data (like email, phone, and address) to improve conversion attribution, especially on devices where cookies are limited.
To enable this manually:
- In Google Ads, go to your conversion action > Enhanced conversions > Turn it on.
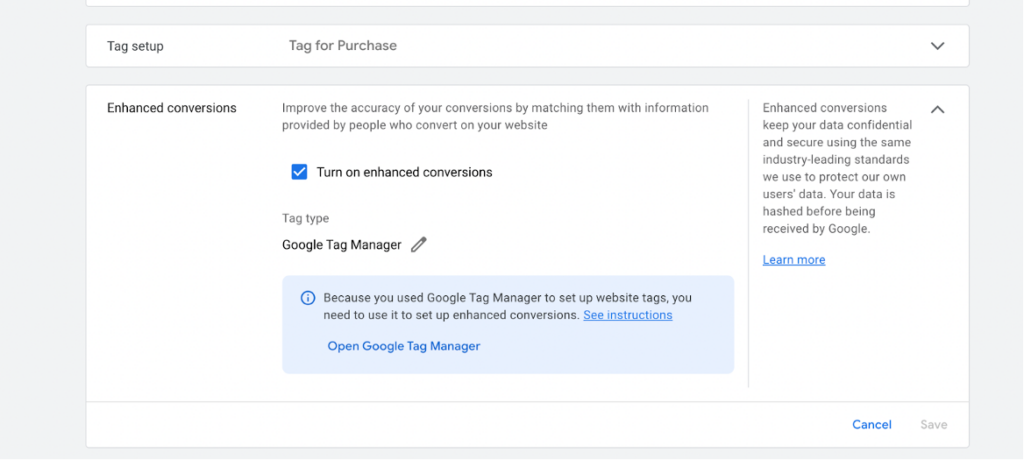
- You’ll need to edit your conversion tag to include code that captures customer data from Shopify’s checkout.
- This often requires JavaScript customization and access to checkout.liquid, which is only available on Shopify Plus.
⚠️ Note: If you are not on Shopify Plus or you don’t want to mess around with coding, this part would be hard to implement manually, hence many merchants rely upon a tracking app to take care of it for them.
Final thoughts
Accurate conversion tracking is key to running effective Google Ads. Without it, you’re likely wasting budget and missing real performance insights.
Shopify does offer some rudimentary tools, but they are usually inadequate in terms of enhanced conversions and reliable event tracking.
Are you looking for a better way to convert with fewer headaches from tech? If yes, then Trakpilot is worth checking out.
- 1- What is Google Ads Conversion Tracking?
- 2- Why You Need Accurate Conversion Tracking on Shopify
- 3- Common Ways to Set Up Google Ads Tracking on Shopify
- 4- How to Set Up Google Ads Tracking on Shopify with Trakpilot (No Tech Skills Needed)
- 5- How to Set Up Google Ads Conversion Tracking on Shopify Manually (Step-by-Step)
![How to Connect Wix to TikTok Shop: Step-by-Step Guide [2025]](https://twoowls.io/wp-content/uploads/2025/09/Connect-Wix-to-TikTok-Shop.jpg)
How to Connect Wix to TikTok Shop: Step-by-Step Guide [2025]
Top 10 Best Advertising Apps for Shopify That Actually Work
TikTok Catalog Ads: A Quick Guide for Shopify Merchants
How to Run TikTok Ads for Shopify & Turn Scrolls Into Sales
How to Connect Wix to TikTok Shop: Step-by-Step Guide [2025]
Top 10 Best Advertising Apps for Shopify That Actually Work
TikTok Catalog Ads: A Quick Guide for Shopify Merchants
How to Run TikTok Ads for Shopify & Turn Scrolls Into Sales
Is TikTok Events API Better Than Pixel? Here’s the Truth
How to Connect Wix to TikTok Shop: Step-by-Step Guide [2025]
Top 10 Best Advertising Apps for Shopify That Actually Work
TikTok Catalog Ads: A Quick Guide for Shopify Merchants
How to Run TikTok Ads for Shopify & Turn Scrolls Into Sales