How to Install Twitter Pixel: Every Method You Should Know
If you’re running Twitter Ads, installing Twitter Pixel is no longer optional; it’s essential. This power tracker allows you to see conversion data, retarget visitors, and optimize campaign performance based on real-time data. In this guide, we’ll walk you through how Twitter Pixel works, how to install it on Shopify, and how to get the most out of your ad efforts.
What is Twitter Pixel?
Twitter Pixel is just a piece of code that you copy to your website to track user behavior and analyze the effectiveness of your efforts on Twitter. After it is installed, you'll be able to collect phenomenal data regarding visitors' interactions with your store once they have clicked on your Twitter ads.
What Does Twitter Pixel Actually Do?
Twitter Pixel is your behind-the-scenes powerhouse. It helps track user behavior, optimize campaigns, and retarget potential customers, all automatically. Let’s break down what it actually does and why it matters for your Shopify store.
Tracks Conversions Across Your Store
First and foremost, this event will track all those specific actions performed by users who were redirected after clicking on your Twitter ads. Actions such as purchases, form submissions, product views, add-to-cart events, etc., are examples of such actions.
Now, you won't have to speculate about what’s working. Instead, you get a clear view of how your ads are influencing real business outcomes.
Optimizes Your Twitter Ads in Real Time
In addition to this, Twitter Pixel not only collects data. It actually utilizes the data for the optimization of ad delivery. Given that the system knows the profiles of users that are more likely to convert, it constantly modifies the targeting and delivery of ads.
This means that your ads will only be shown to the right people, at the right time, making it more efficient and without wasting budget.
Builds High-Converting Retargeting Audiences
In addition, Twitter Pixel allows you to build a retargeting audience, a group that consists of users who visited but did not take action on your site. These are relatively warm leads and, as a result of retargeting, you can have a higher chance of achieving conversion with lower costs.
For example, you can specifically target users who abandoned their carts with a campaign, bringing them back into the fold to complete the purchase.
Measures Campaign Performance with Real Insights
The best of all is measuring ad efficiency using exact science. Instead of measuring with the so-called vanity measures like impressions or clicks, conversions caused and revenue earned through every campaign are tracked.
Thus you know exactly what is working to scale it and what is not to throw it out, all based on hard data.
How to Find Twitter Pixel ID?
You'll need your Twitter Pixel ID to track user actions and optimize Twitter Ads campaigns. Here’s how to get it using the latest interface:
Step 1: Log in to Twitter Ads
Go to the Twitter Ads Manager and sign in with your business account credentials.
Step 2: Open Events Manager
In the top navigation bar, click on Tools, then select Events Manager from the dropdown menu.
This is where you manage conversion tracking and event sources.
Step 3: Create a New Pixel (if you don’t have one yet)
Click Add event source.
Choose “Install with Pixel code” as your setup method. Enter a name for your pixel and click Save.
Step 4: Find Your Twitter Pixel ID
Once your pixel is created, it will appear in the list under Events Manager.
You’ll see a unique Pixel ID next to the name of your event source, copy this ID to use in your store or app integration.
If you want to track different actions across your funnel, create Twitter Events inside the same Events Manager:
Click “Add Event Source.”
Add each event you want to track, such as:
- View Content
- Add to Cart
- Checkout Initiated
- Purchase
Each event will generate its own unique Event ID for tracking.
Twitter Pixel with Shopify: Why It Matters
When paired with Shopify, Twitter Pixel becomes much more than a tracking tool, it’s a performance engine. Integrating pixel tracking directly into your store gives you insight into how Twitter users behave after clicking your ads.
This helps you to build high-converting re-targeting audiences, measure true conversion value, and optimize ad delivery in real time. One product, or thousands, Twitter Pixel with Shopify helps you track all major user actions without a hassle like viewing products, bringing items into the cart, or purchasing them.
Much more so, the flexible structure of Shopify makes it easy to integrate the pixel with advanced solutions such as Twitter Conversion API. This gives you both browser-based and server-side tracking, ensuring greater accuracy across all devices and user journeys.
How to Install Twitter Pixel on Shopify?
Setting up Twitter Pixel tracking on your Shopify store allows you to monitor user actions, measure conversions, and improve ad targeting.
| Method | Skill Level | Conversion API Support | Best For |
|---|---|---|---|
| Option 1: Manual Setup (Code) | Advanced (coding required) | No | Developers comfortable with Liquid & JS |
| Option 2: Google Tag Manager (GTM) | Intermediate | Optional via server container | Marketers already using GTM |
| Option 3: Conversion API (CAPI) | Expert (developer-level) | Yes | Technical teams handling server-side tracking |
| Option 4: Twitter Multi Pixels by Omega | Beginner (no code) | Built-in | Merchants who want accuracy without coding |
👉 See the detailed setup guides for each method below to choose what fits your workflow best.
Option 1: Manual Setup (with Code)
⚠️ This method can be tricky and time-consuming, especially if you’re not familiar with Shopify’s theme code or event tracking setup.
Step 1: Get your Twitter Pixel code
Log in to your Twitter Ads Manager.
Go to Tools > Events Manager.
Create a new event source or open an existing one.
Choose “Install with Pixel code” and copy the base pixel snippet provided.
Step 2: Add the Pixel code to your Shopify theme
In your Shopify admin, go to Online Store > Themes.
Click Actions > Edit code for your current theme.
Open the theme.liquid file under the Layout folder.
Paste the Twitter Pixel base code right before the closing </head> tag.
Click Save.
Step 3: Add Event Tracking (e.g., Add to Cart)
Identify the button ID for “Add to Cart” by inspecting your store’s product page.
Go back to theme.liquid, scroll to the bottom and paste this code before </body>:
<script>
document.getElementById('add-to-cart').addEventListener('click', function() {
twq('track', 'AddToCart', {
content_name: '{{ product.title }}',
content_category: '{{ product.type }}',
content_ids: ['{{ product.id }}'],
content_type: 'product',
value: {{ product.price | money_without_currency }},
currency: '{{ shop.currency }}'
});
});
</script>
Step 4: Verify Installation
Use the Twitter Pixel Helper browser extension to check if your pixel is firing correctly.
Option 2: Install Twitter Pixel via Google Tag Manager
If you’re already using Google Tag Manager (GTM), this is a clean and flexible way to add and manage your Twitter Pixel without touching Shopify’s theme code.
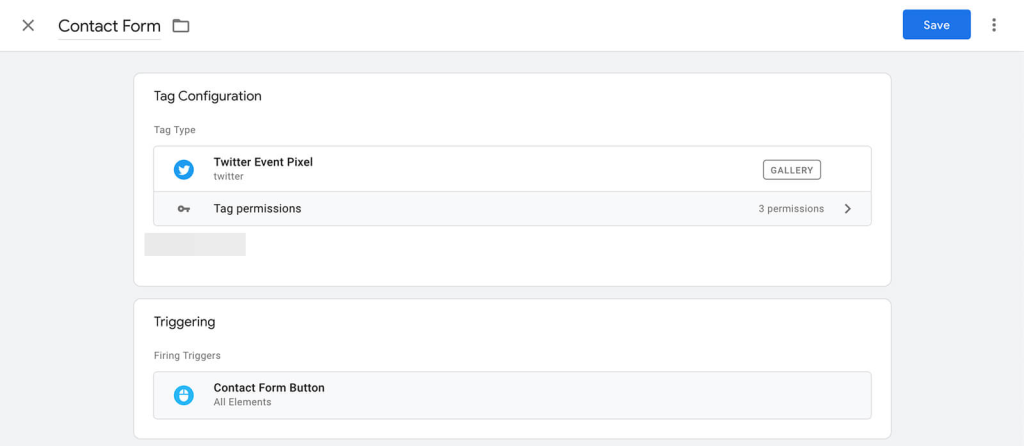
Step 1: Add the base pixel tag
Open your GTM dashboard.
Go to Tags > New, then click Tag Configuration.
Choose Community Template Gallery, search for “Twitter Pixel”, and install it.
Select All Pages as the trigger, name the tag, and save it.
Step 2: Get your Pixel ID from Twitter Ads
Go to Twitter Ads > Events Manager.
Click Install With Tag Manager, then copy your Twitter Pixel ID.
Paste it into the GTM tag settings.
Step 3: Add event-specific tags (optional)
For each conversion event (e.g. Add to Cart, Purchase), create a new tag using the Twitter Event Pixel template.
Assign appropriate triggers for each action.
Option 3: Install Twitter Pixel with Conversion API (Advanced – For Developers)
Twitter Conversion API (CAPI) is a server-side tracking method that allows your website to send conversion events directly to Twitter Ads, bypassing browser-based tracking, which can be blocked by ad blockers or privacy settings.
CAPI tracks more reliably, especially in cases where browser tracking is restricted. By combining Twitter Pixel with Conversion API, you reduce data loss, improve attribution accuracy, and maximize campaign performance.
However, to implement CAPI manually, you’ll need:
- A Twitter Developer account
- Access to the Twitter Ads API
- A backend server capable of sending HTTPS requests to Twitter
🧩 Not a developer? Don’t worry, Twitter Multi Pixels by Omega supports Conversion API out of the box. No coding, no complexity, just accurate, server-side tracking built right in.
Option 4: Employ Twitter Multi Pixels by Omega (No coding requirements)
If you are a merchant who wants to do everything fast, in a more dependable way, and with no theme file editing, then the third-party app is the most suitable option.
If you’re looking for a simple way to manage your Shopify Twitter Pixel, Twitter Multi Pixels by Omega offers a no-code solution with full Conversion API support.
Key features include:
- Multiple Pixel Support: You're able to easily add and manage more than one Twitter Pixel inside the same store – especially useful for those businesses running several ad accounts or marketing campaigns.
- In-built Conversion API: Ensures more accurate tracking, even where browser-based methods fail (e.g., cases of ad blockers and privacy settings).
- No-Code Installation: Requires minutes of installation without ever touching the theme or code of the store.
- Better Performance in Tracking: Stronger source data for merchants increasing their campaign optimization and return on ad spend (ROAS).
- Real-Time Monitoring: Events can be accessed with less effort and in-app debugging.
Best Tips to Enhance Your Twitter Ad Performance With Pixel
Now that your pixel is properly set, it is time to work it for the business. Here are five of the most effective ways to enhance ad performance through pixel data.
1. Track the Right Events
Track real conversion points that matter, such as product views, add-to-cart actions, checkouts, and completed purchases. These high-intent events allow Twitter to optimize ad delivery based on real business performance.
In addition, it does not track too many micro-interactions, such as page scrolls or button hovers. Clean, relevant event data helps in reducing noise, improving targeting precision, and thus, reducing cost per acquisition.
2. Merge Pixel with the Conversion API
Tolerance for privacy features, ad blockers, and cookie restrictions is fast rendering browser-side tracking unreliable and converting it into under-reported conversions, thus making it impossible for the organization to optimize the campaigns properly.
Use Twitter's Conversion API to let your server send data directly to address this issue. Applications like Twitter Multi Pixels created by Omega simplify the process; both pixel and CAPI setups are handled without the need to touch the store's code.
3. Monitor Events in Real-Time
Pixel setups can become silent casualties after a theme update, an app conflict, or layout changes. While you may not notice anything unusual, events might stop firing properly, causing you to lose valuable tracking data.
That’s why it’s crucial to monitor the health of your tracking setup in real time using tools like Omega Twitter Pixel Helper or built-in dashboards from your integration app.
If you’re using Twitter Multi Pixels by Omega app, you can also monitor all Twitter Pixel and CAPI events directly in real time, allowing you to confirm every signal is firing and syncing correctly right after installation.
The earlier you detect issues, the less data you lose, and the better your ads stay optimized.
4. Build Custom & Lookalike Audiences
Using the Twitter Pixel, it is possible to retarget customers engaging with your store, like those who visited a product, went through checkout, or abandoned checkout. Compared to cold traffic, these audiences are likely to respond much better and will therefore create a more potent ROAS.
Apart from retargeting, lookalikes also create new audiences by simply mimicking the behavior of your best customers and in so doing, open up new avenues of acquisition of new users who statistically are most probably going to convert.
5. A/B Test Creatives Using Pixel Insights
Leverage pixel data to find ad creatives responsible for the highest conversions and study the differences in terms of their form, headline, visual, and message. The findings should back creatives versus budgets.
In the long run, consistent A/B testing refines performance continuously. Along with reliable event tracking, this method leads to tangible improvements in the areas of CTR, ROAS, and customer acquisition costs.
Conclusion
Implementing Twitter Pixel correctly is the foundation for smarter advertising and better business decisions. From tracking key events to Conversion API usage and building high-performing audiences, each one of these stages gets the maximum out of your ads.
Twitter Multi Pixels by Omega is your sure bet should you want an easy way to get the Twitter Pixel integrated into your Shopify store without the technical hassles, which, of course, comes with assistance for pixel and server-side tracking.

- 1 What is Twitter Pixel?
- 2 What Does Twitter Pixel Actually Do?
- 3 How to Find Twitter Pixel ID?
- 4 Twitter Pixel with Shopify: Why It Matters
- 5 How to Install Twitter Pixel on Shopify?
- 6 Best Tips to Enhance Your Twitter Ad Performance With Pixel
Omega TikTok Pixel: New Conversion Analytics is here

Top TikTok Apps for Shopify Could Double Your Conversions
Deduplication in Facebook Pixel: How to Fix Duplicate Events and Track Data Correctly
Omega TikTok Pixels Now Speaks Your Language: Introducing Multi-Language Support
Top TikTok Apps for Shopify Could Double Your Conversions
Deduplication in Facebook Pixel: How to Fix Duplicate Events and Track Data Correctly
Omega TikTok Pixels Now Speaks Your Language: Introducing Multi-Language Support

Trakpilot New Feature: Export Your Conversion Events Data
Shopify Analytics Discrepancies: What’s Actually Happening?
Top TikTok Apps for Shopify Could Double Your Conversions
Deduplication in Facebook Pixel: How to Fix Duplicate Events and Track Data Correctly
Omega TikTok Pixels Now Speaks Your Language: Introducing Multi-Language Support
Trakpilot New Feature: Export Your Conversion Events Data