How to Set Up Facebook Pixel with Google Tag Manager (Meta Pixel)
Facebook Pixel monitors visitor activity on your website and sends this information to the linked advertising platform. If you're using Google Tag Manager (GTM) to stay on top of your website's tracking, you can set up Facebook Pixel with Google Tag Manager. In this blog post, I'll guide you through the process, step by step.
How to Get Meta Pixel Code?
Step 1: You can obtain the pixel code from your Facebook account by following these instructions:
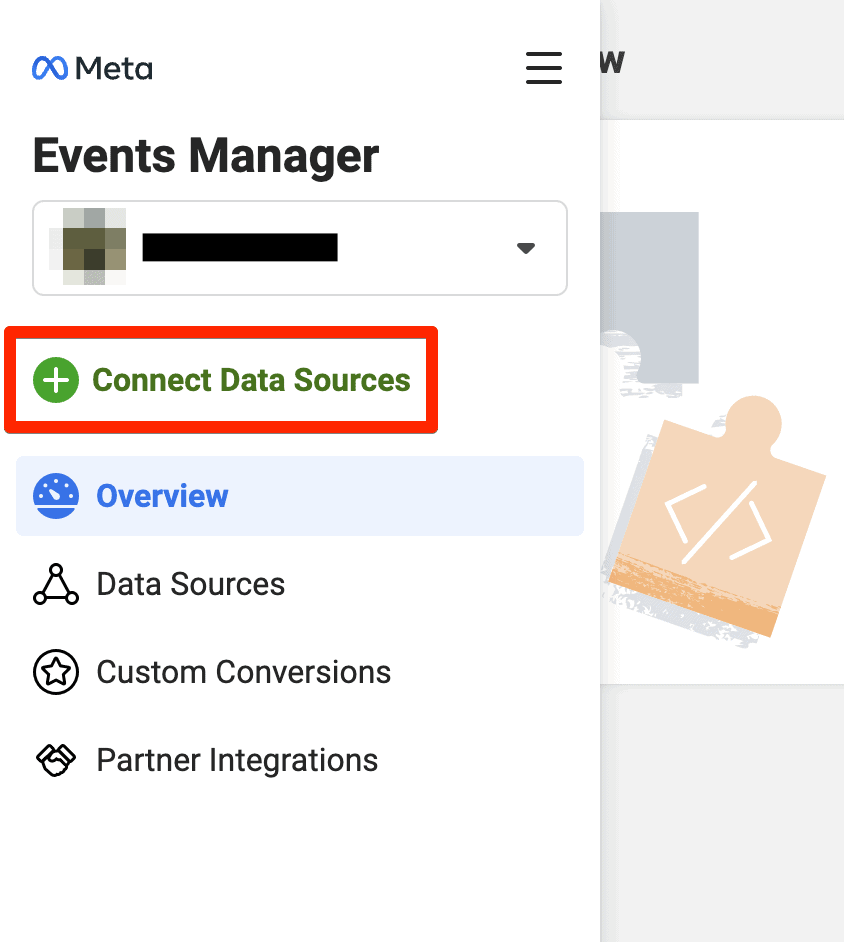
- Navigate to Meta Events Manager.
- If you haven't generated any Facebook Pixel code previously, click on the green Connect Data Sources button.
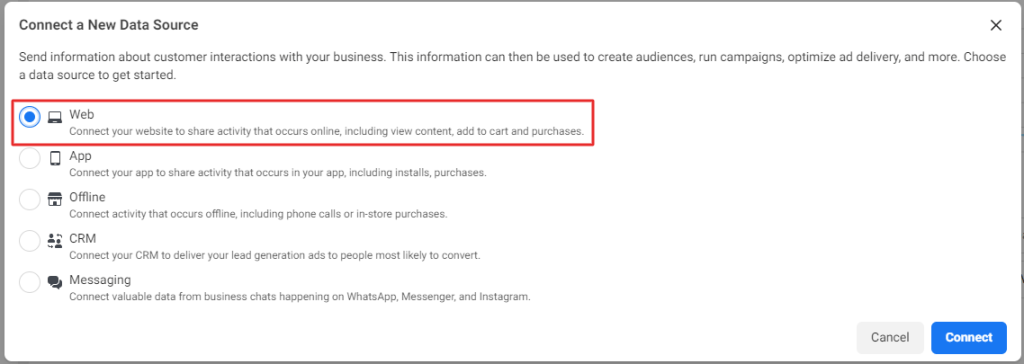
Step 2: Then, choose "Web" as the data source. Please note that you must have a business manager account to proceed with this step.
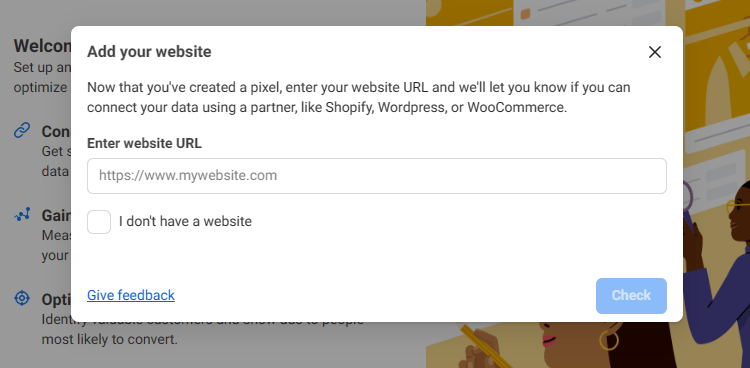
Step 3: Now, you have the option to name your Pixel. Simply click on "Create Pixel", and it will generate a new ID visible in your Events Manager.
Next, enter your website URL.
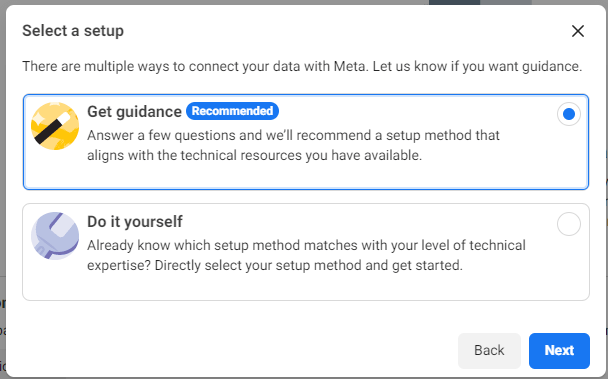
Then, you'll then be presented with the choice to get guidance or do it yourself.
You will need to answer questions such as:
- What’s your advertising budget?
- What are your cloud provider details?
- Are you an internal team or an agency?
- What is your technical expertise level?
While these questions are optional, it is advisable to answer all of them to receive the most beneficial recommendation.
Now you will have the option to choose whether to connect only the Facebook Pixel or both the pixel and Conversion API.
But if you're not sure which to choose, read here: Conversion API vs Facebook Pixel: Which one to choose?
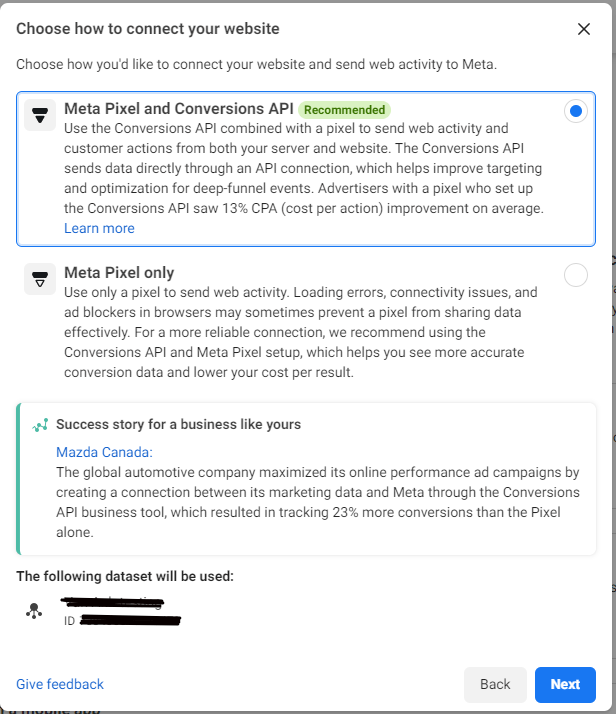
If you choose the option to connect both the Pixel and Conversion API, it will appear like this.
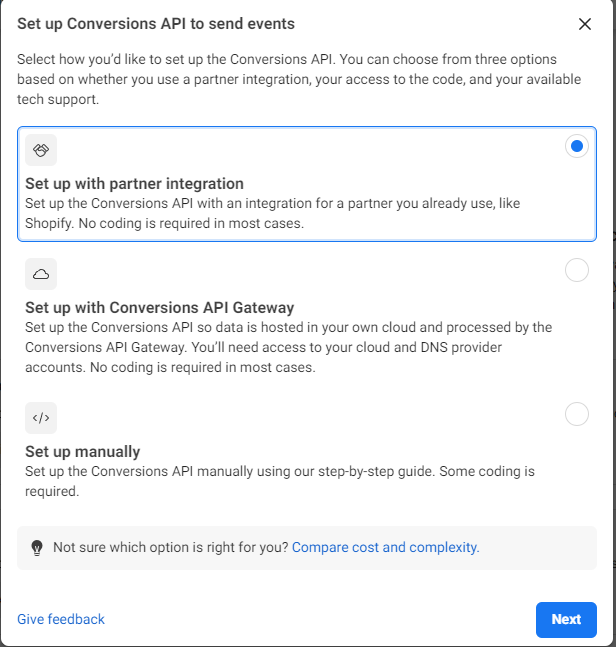
For instructions on setting up Conversion API, you can find it here: Facebook Conversion API 101: Free explanation and action guide [2026]
Step 4: Clicking on the "Set up with partner integration" button will lead you to a screen displaying various options for installing the Pixel code, including the option to use Google Tag Manager.
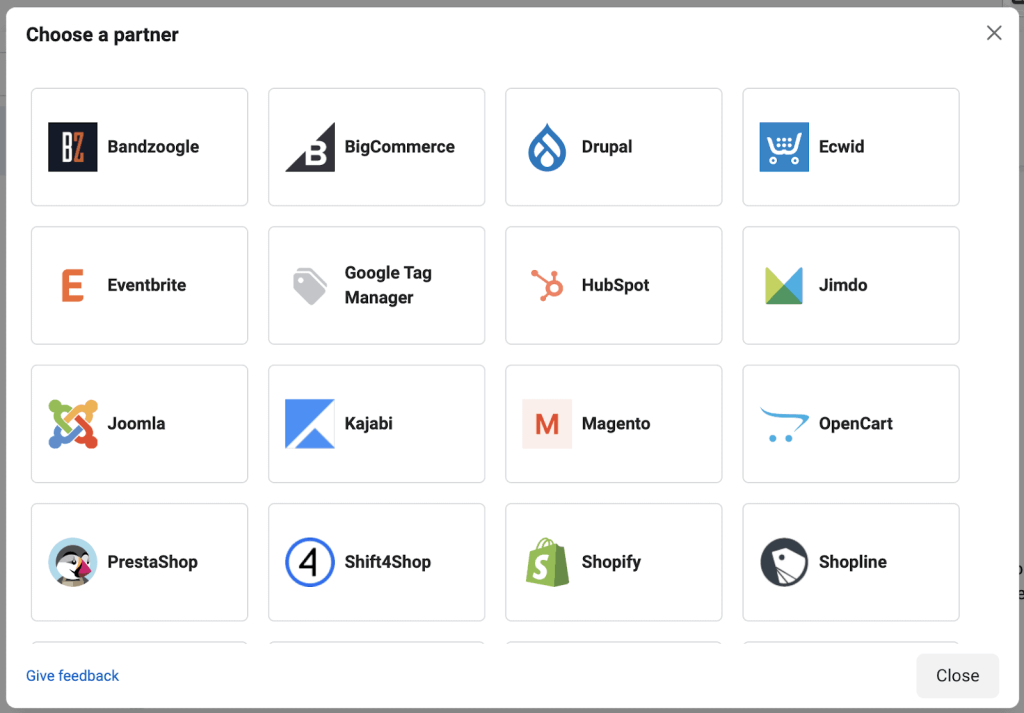
I discourage using this method because it grants Meta access to your container, allowing them to edit, add, and remove tags. It also publishes the container without warning, which can be problematic if you're still working on tags.
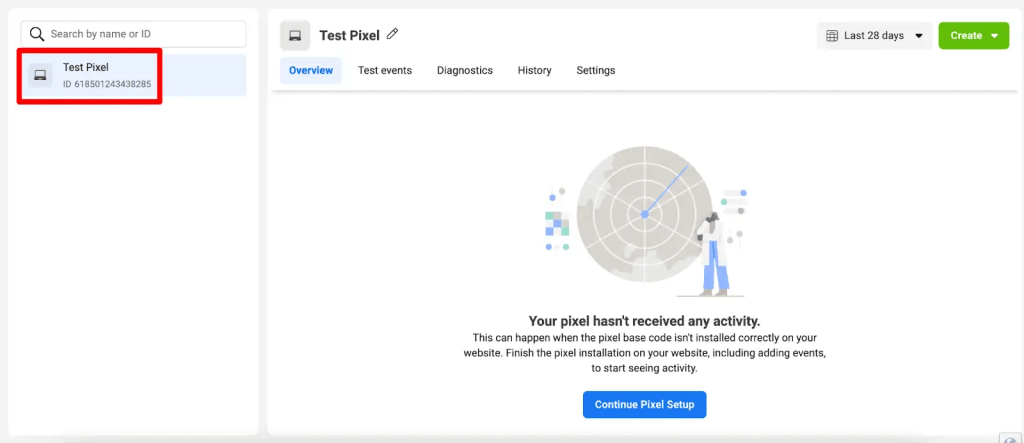
Instead, if you close this prompt, you can find your Pixel ID in the Events Manager, which we'll use in GTM in the next section.
Setting up Facebook Pixel with Google Tag Manager (Step-by-step)
Now that we have the necessary components, we can access our GTM account (assuming it's already set up) and integrate the Meta Pixel code, also known as the base code.
There are 2 ways to install the Facebook Pixel via Google Tag Manager:
- Use a community tag template.
- Employ a custom HTML tag.
Sounds difficult, right? You might find it a bit overwhelming if you're not familiar with the process. These methods are widely used due to their longevity and stability, but nowadays, there are many faster and easier options available, such as using apps specialized in setting up Facebook Pixel, like Two Owls Omega Facebook Pixels.
However, if you still want to learn how to set up using the traditional method, with complex steps, then read on. I'll walk you through each step one by one.
Firstly, whether you choose option 1 or 2, you still need to have a Google Tag Manager account. If you don't have an account, below are the steps to create one:
Step 1: To set up a new Google Tag Manager account, go to tagmanager.google.com, and click the "Create Account" button in the top-right corner.
Step 2: Ideally, your account name should reflect your company name, while the container name should correspond to your website name. After naming the account and container, click the CREATE button located at the bottom left.
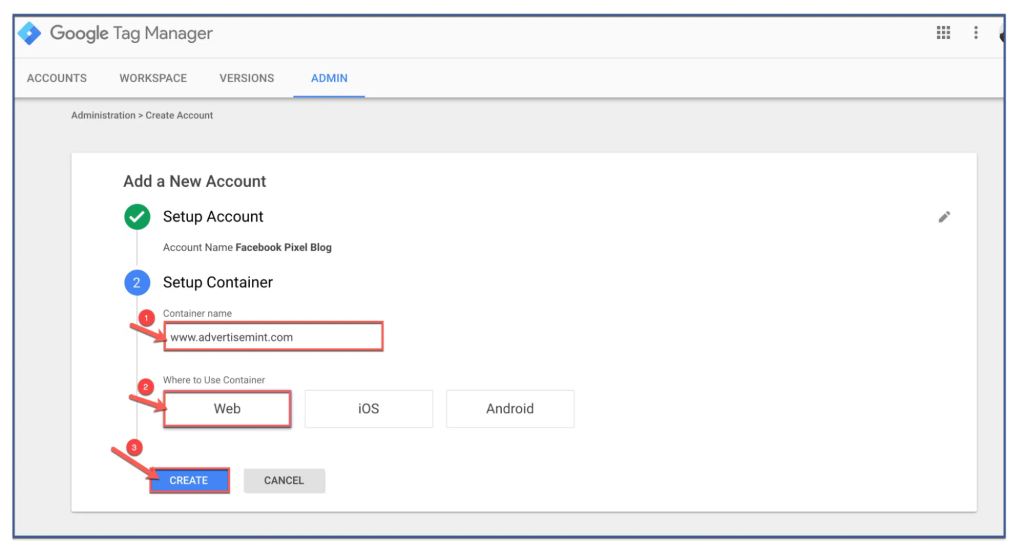
Congratulations! You've successfully set up your new Google Tag Manager account. You can find your GTM Container ID and the container snippet code highlighted in the image below.
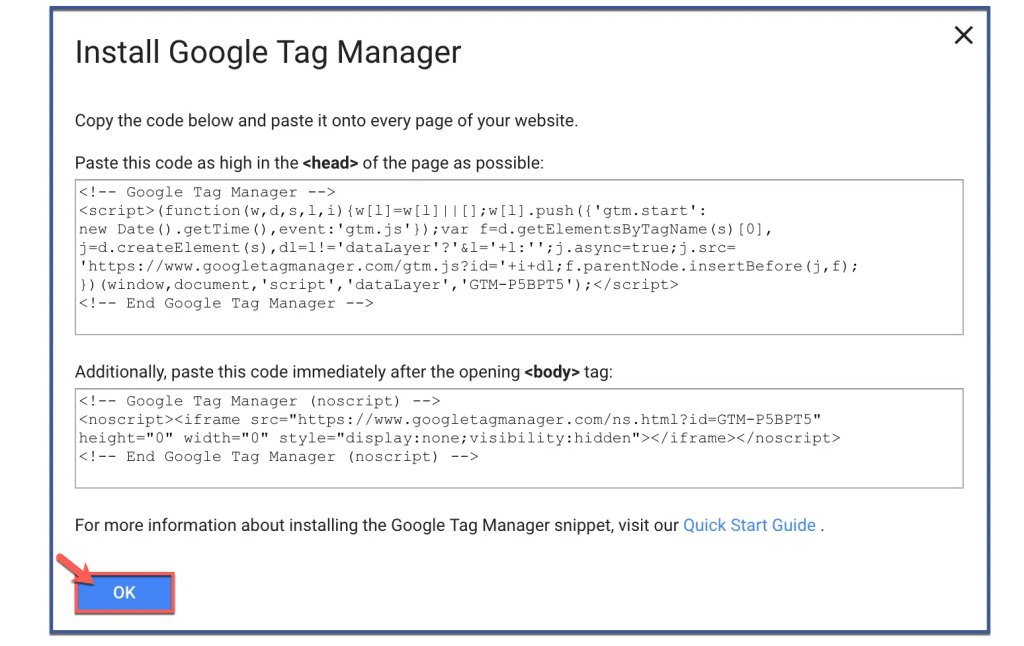
Option 1: Use a community tag template for installation
To begin, let's generate a basic page view tag. Navigate to the Tags section on the left panel, then select the New button on the right.
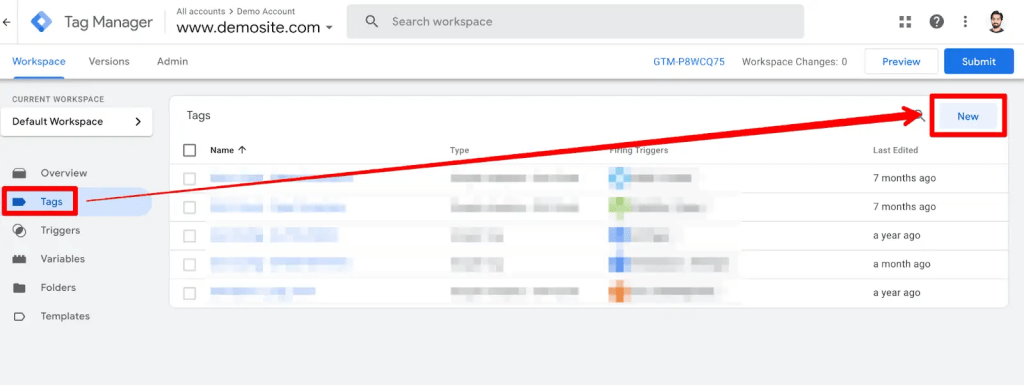
Within the Tag configuration interface, locate the Facebook Pixel template by facebookpixelarchive in the GTM tag template gallery by searching for "Facebook" (it's still referred to as Facebook in some areas). Select this template.
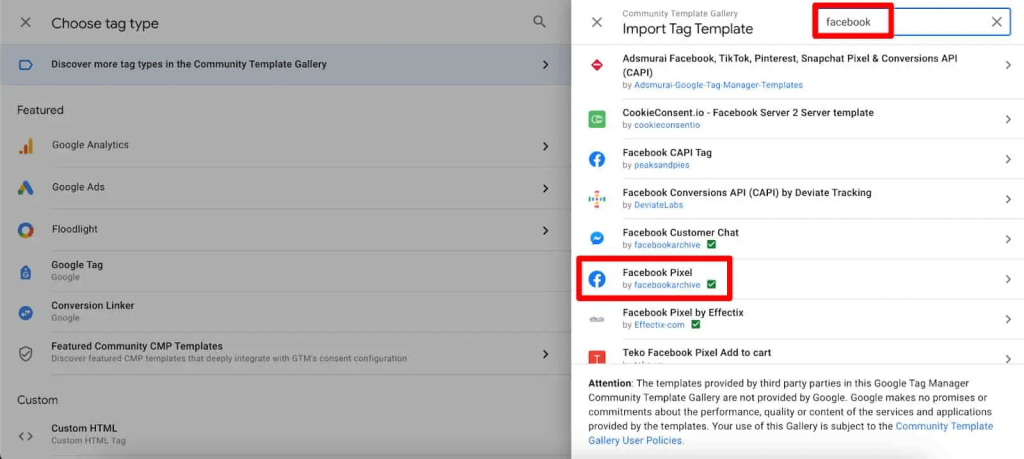
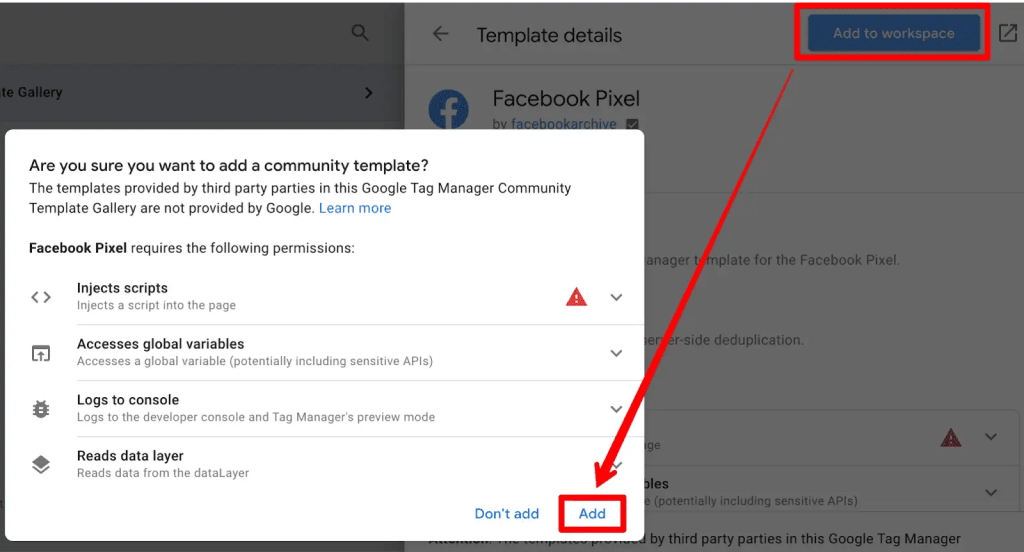
Select the "Add to Workspace" button, followed by clicking on the "Add" button once more.
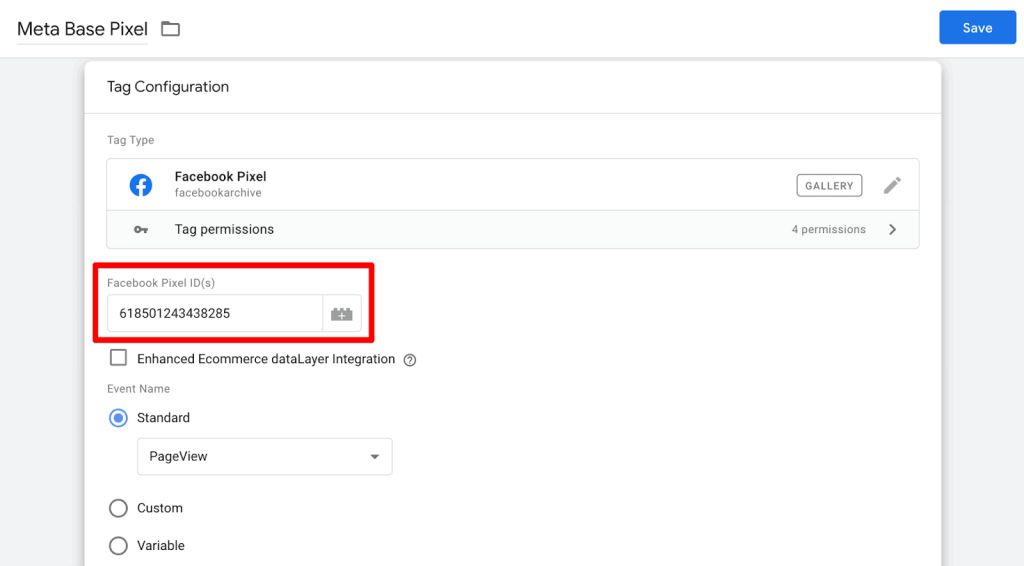
Within the Tag Configuration interface, input the Facebook Pixel ID that we observed in the Events Manager.
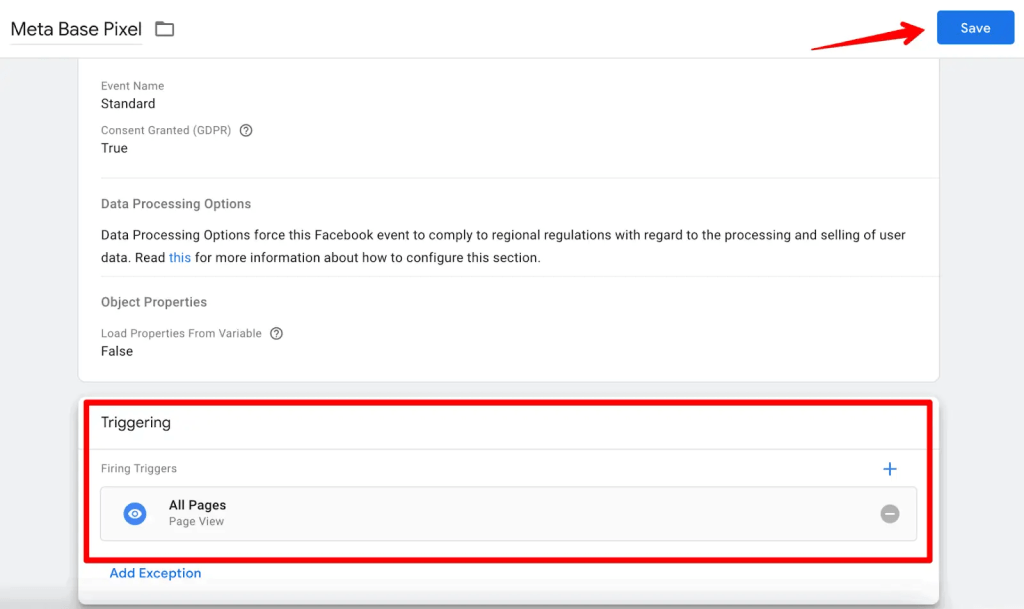
Because we aim for the base pixel code to be activated on all pages, we will opt for the "All Pages Page View" trigger and proceed to save the tag.
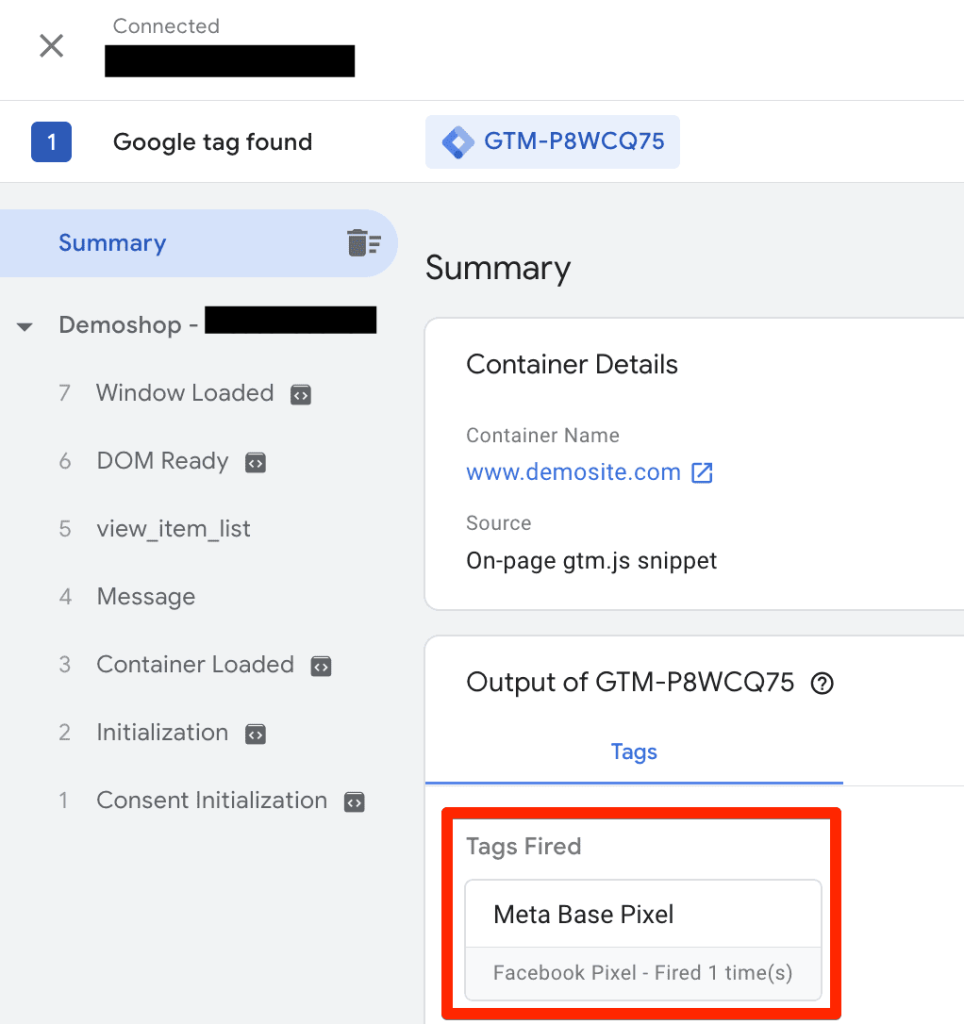
The final step involves confirming that the pixel code is loading on our demo site by using GTM's preview mode and tag assistant.
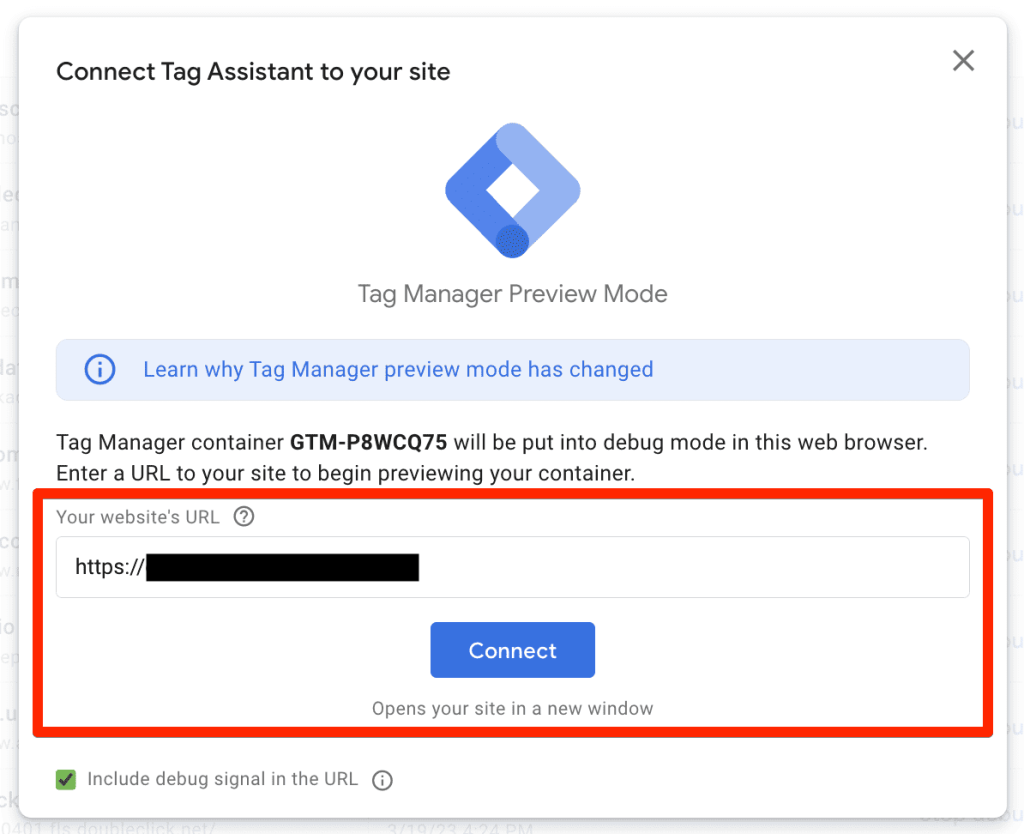
If the tag is firing correctly, it indicates that the setup in GTM is functioning properly.
Option 2: Implement using a custom HTML tag
To install with a custom HTML tag, you need to retrieve the code from the Events Manager.
Return to your Pixel, and select Manage Integrations → Manage → Add to another website.
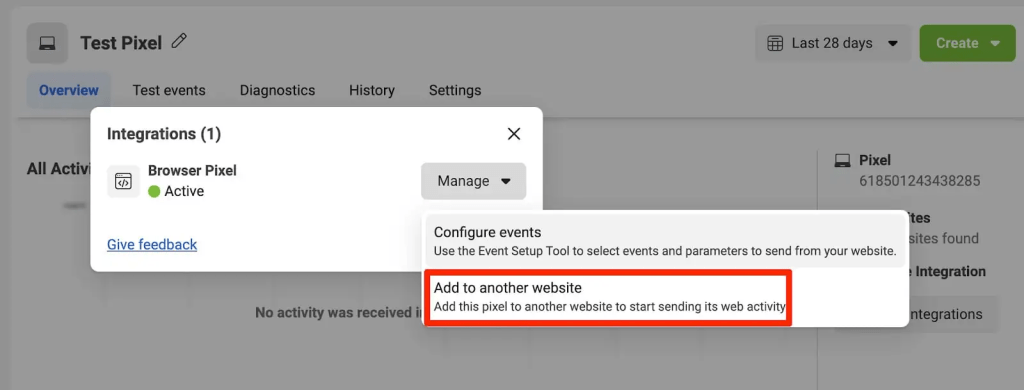
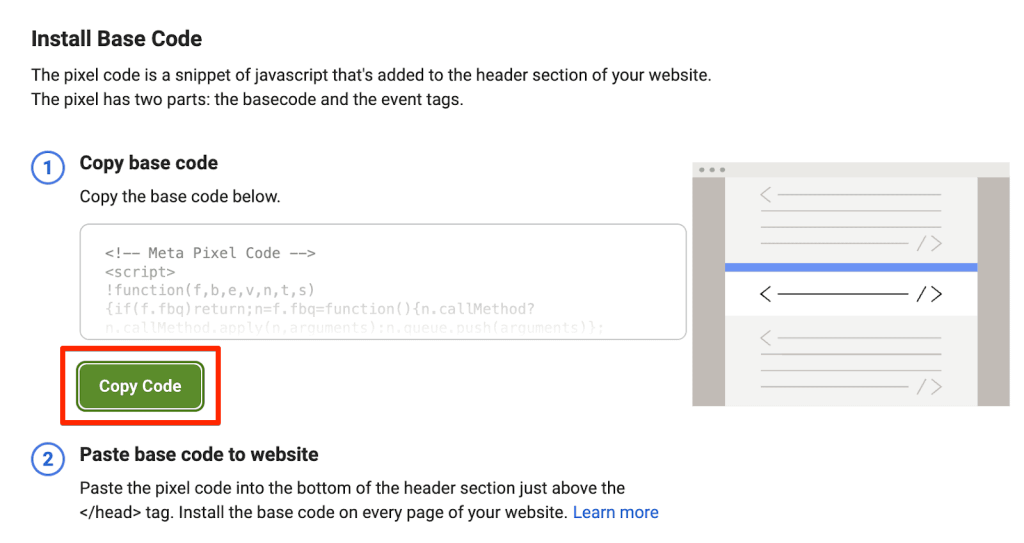
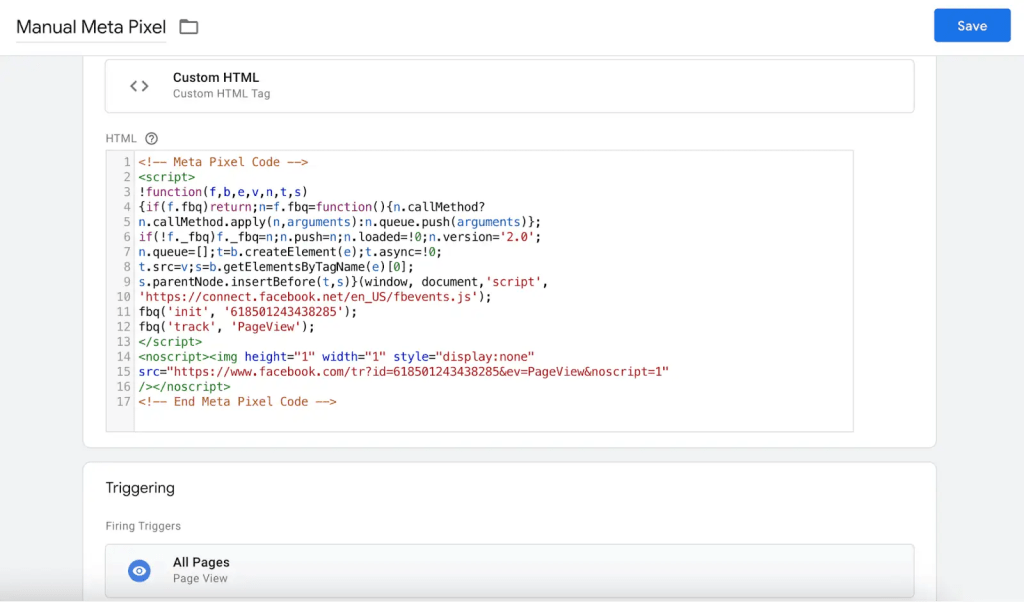
Click on the "Install code manually" button, as demonstrated in the "Getting Meta Pixel Code" section above. Then, proceed to copy the code.
Navigate to Tags in GTM, then select the option to create a new tag and choose Custom HTML.
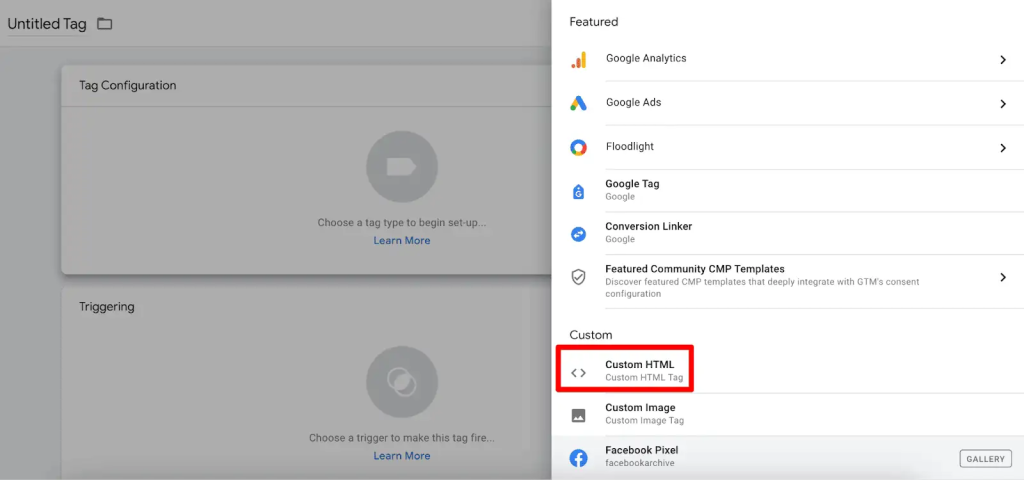
Paste the base code into the tag and apply the "All Pages Page View" trigger, just like we did for the first method.
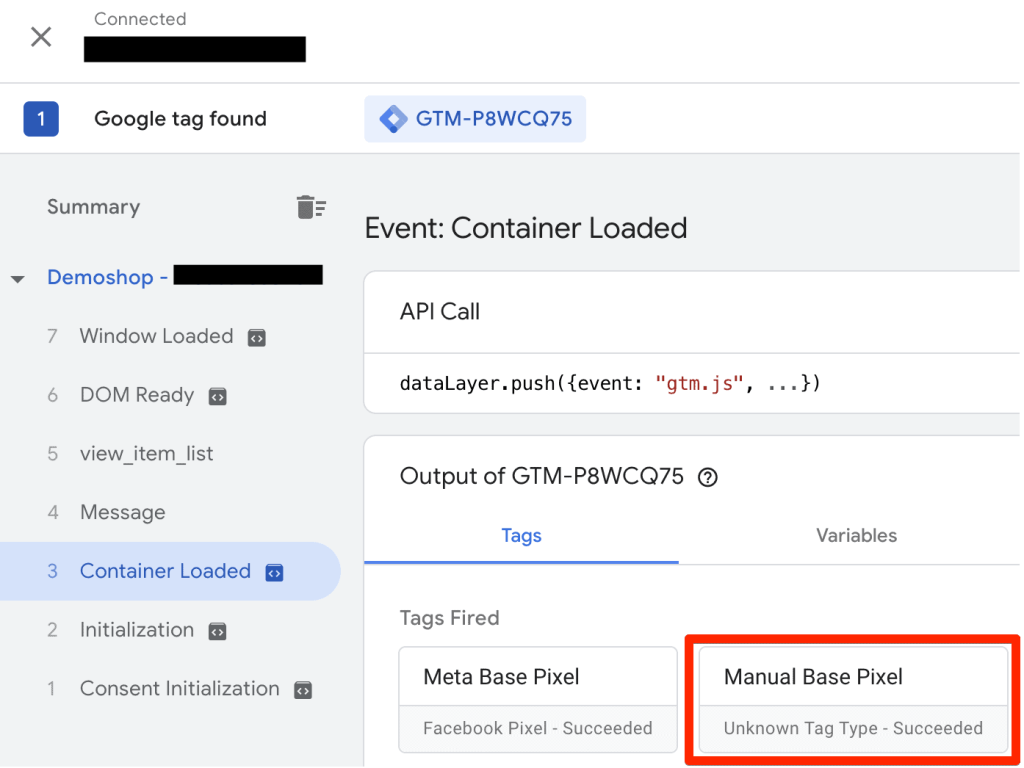
Lastly, we can test the tag in preview mode to ensure that the Manual Base Pixel tag is firing correctly.
The drawback of using the manual method is that you'll need to modify the code each time you wish to add additional events besides the basic PageView.
Alternatively, if you prefer not to edit the base code, you can create separate tags. However, it's essential to ensure they fire after the base code is loaded, which can be somewhat cumbersome.
Nevertheless, employing either method ensures that events are now sent to the Meta Events Manager.
How to Check if Meta Pixel is Installed Correctly?
Here are the most effective ways to check if your Facebook Pixel is installed correctly:
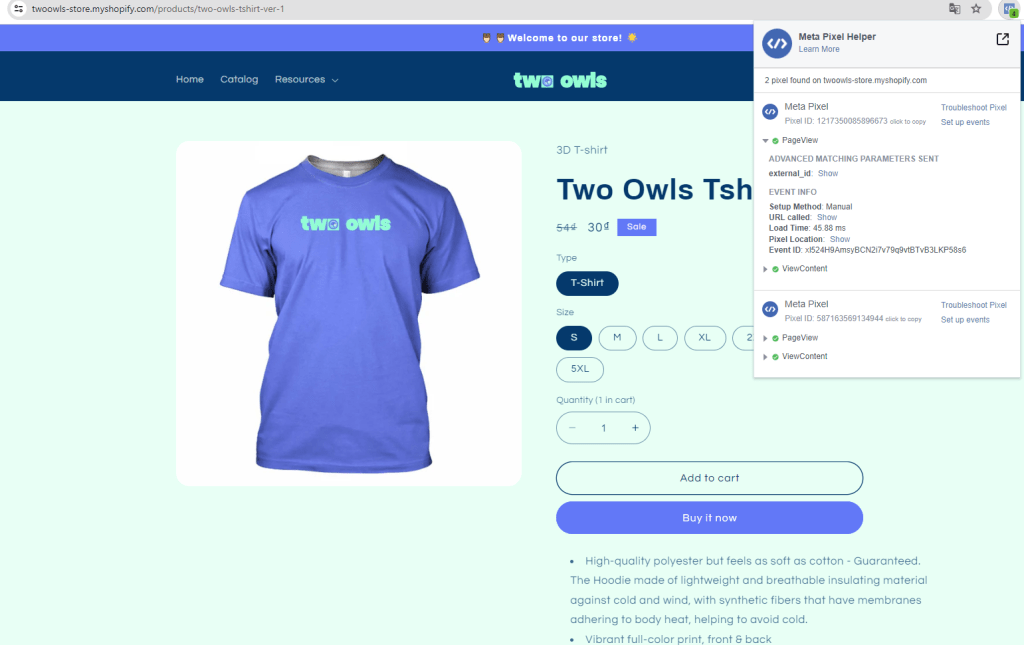
#1 Using the Meta Pixel Helper
This is the easiest, most recommended method:
- Install the "Meta Pixel Helper" Chrome extension from the Chrome Web Store.
- Visit your website where the Pixel is installed.
- Click the Pixel Helper icon in the browser toolbar.
- If the icon turns blue, it indicates a Pixel is present on the page.
Checking the details. The Pixel Helper popup will provide more information:
- Pixel ID: This should match the Pixel ID you have in your Facebook Events Manager.
- Event Data: This shows you what events are being sent (e.g., PageView).
- Network Tab: This displays technical details about the Pixel firing.
Learn More: Facebook Pixel Helper: What, Why And How For 2026
#2 Testing Specific Events
- Go to specific pages on your website where you expect certain events to fire (e.g., purchase confirmation page).
- Refresh the page and check the Pixel Helper.
- It should show the corresponding event being sent successfully.
#3 Checking Facebook Events Manager
- Go to your Facebook Events Manager ([invalid URL removed]).
- Check the "Recent Activity" section.
- You should see events being logged from your website.
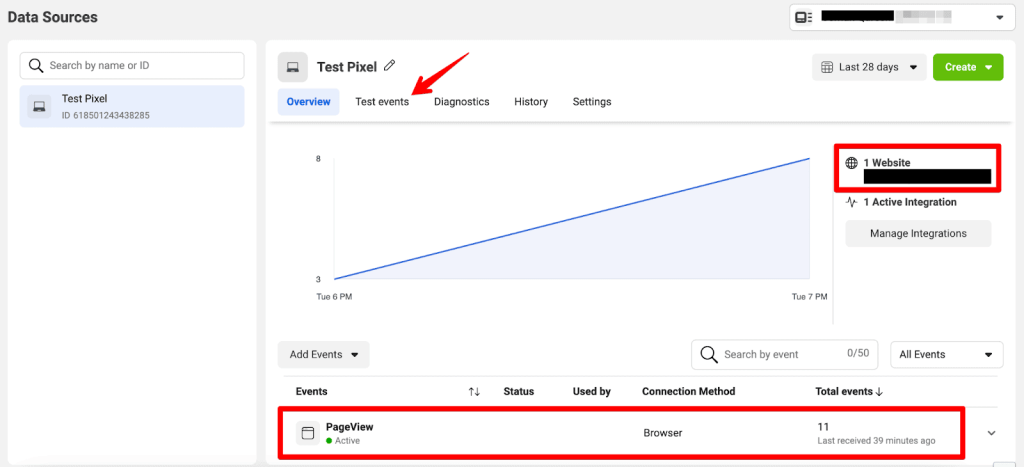
It appears that we are receiving the PageView event, and the installation is confirmed for one website, namely our demo shop.
To verify that events are being received as you navigate through the site, access the Test Events tab.
In the Test Events tab, input your website's URL under Test Browser Events and select the Open Website button. This will open the site in a new tab. Monitor this area as live events are streamed in.
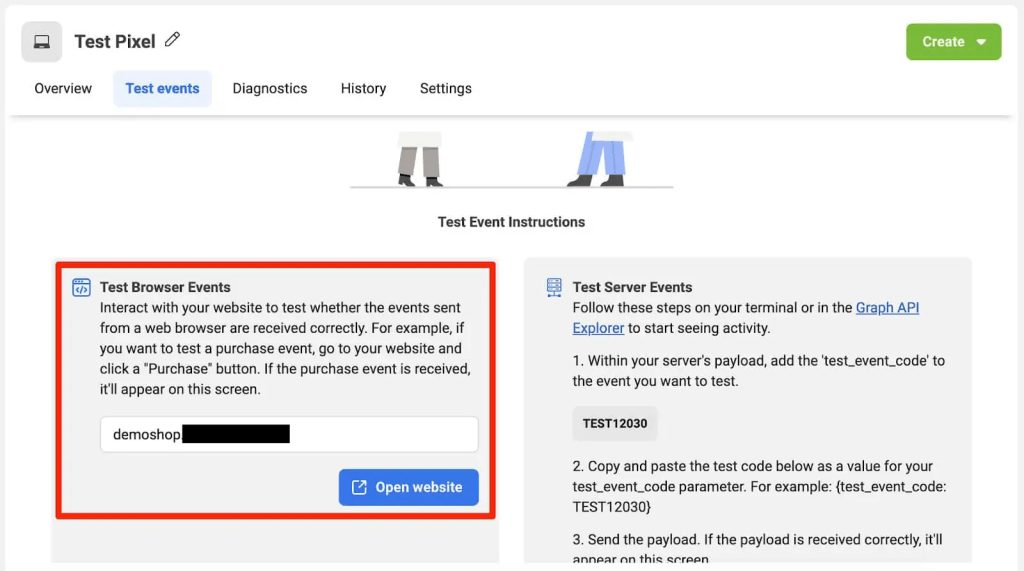
Shortly after, your events should become visible.
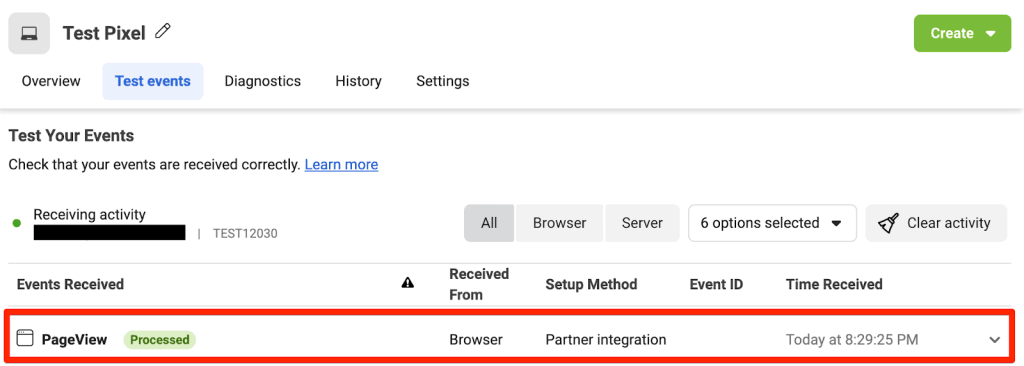
Events marked as "Processed" in green indicate that everything appears to be functioning correctly. You can expand to view additional details of the event if needed.
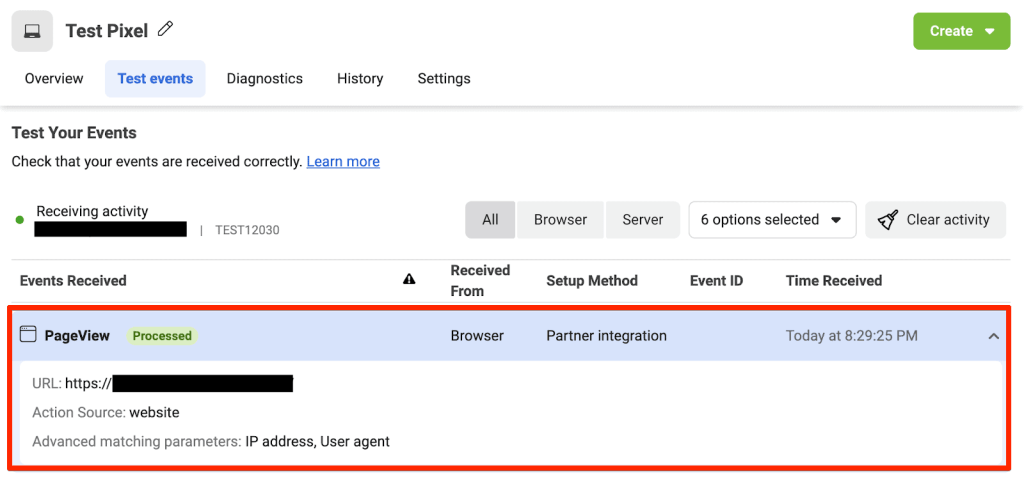
If you see "Partner integration" listed under the Setup Method column, there's no need to worry. It's a bug. Additionally, the Pixel Helper may indicate it as manual, despite being installed using GTM.
How to Track Conversions and Performance After Setup?
Tracking conversions and performance after setting up Facebook Pixel with Google Tag Manager involves 2 main aspects:
1. Setting up Conversions in Facebook Ads Manager
Define Conversion Events
- Identify the specific actions you want to track as conversions, such as purchases, sign-ups, or form submissions.
- Go to Facebook Ads Manager and navigate to "Pixels" within the Events Manager section.
- Click "Set Up Conversions" and choose the desired conversion event category (e.g., Purchase, Lead).
- Follow the prompts to define the specific rules for tracking the chosen event (e.g., URL containing "thank-you").
- Name your conversion event clearly for easy identification in reports.
Connect Pixel and Conversion Events
- Ensure the Pixel you set up in GTM is connected to the Facebook Ads account where you defined the conversion events.
- In Facebook Ads Manager, go to "Pixels" and select your Pixel.
- Under "Manage Conversions", you should see the events you created earlier.
Verify that the event name in Ads Manager matches the event name in your GTM tag.
2. Analyzing Performance of Facebook Pixel with Google Tag Manager
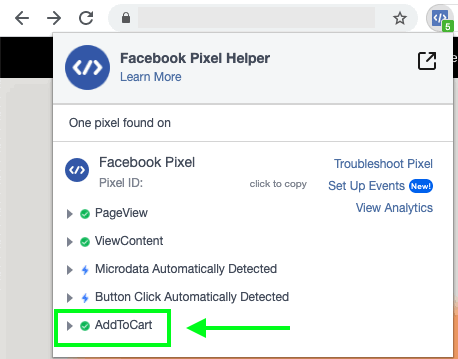
Facebook Pixel Helper
Use the Facebook Pixel Helper Chrome extension to test if the Pixel is firing correctly on your website.
Visit key pages where conversions are expected to occur and check if the Pixel Helper shows the corresponding event being sent.
Facebook Ads Manager Reports
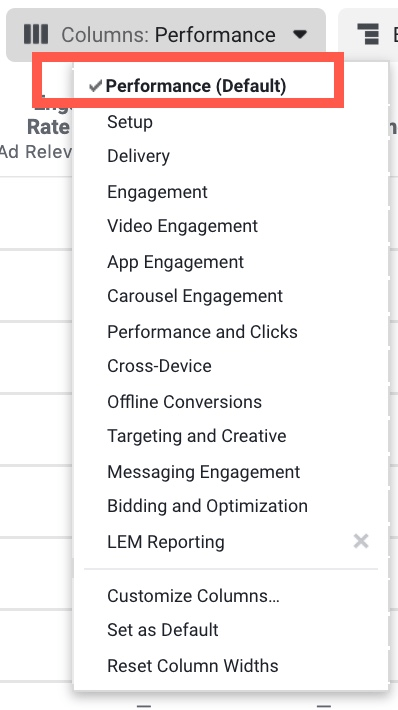
Access the "Ads Manager" section on Facebook and navigate to the "Reporting" tab.
You can analyze various metrics like website visits, conversions, cost per conversion, and other relevant data associated with your Facebook Ads campaigns.
Use filters to analyze performance based on specific campaigns, ad sets, or timeframes.
Common Facebook Pixel Setup Issues with GTM
Facebook Ads are my bread and butter, but even the most seasoned pro can stumble upon glitches when using Google Tag Manager Facebook Pixel. Here's what I've learned from countless campaigns and troubleshooting sessions:
1. Incorrect Pixel ID
This is a classic mistake. Ensure the Pixel ID in your GTM tag matches the one in your Facebook Events Manager. Even a single misplaced digit can prevent the Pixel from firing.
2. Trigger Misconfiguration
The trigger associated with your Pixel tag might be too broad or too narrow:
- Too Broad: An "All Pages" trigger might capture unnecessary data, leading to inaccurate insights.
- Too Narrow: A trigger specific to a single element might miss intended events like purchases or sign-ups.
3. Event Tracking Errors
When setting up specific conversion events like purchases, ensure you're using the correct event code snippets provided by Facebook. Incorrect event names or missing parameters can lead to inaccurate data collection.
4. Pixel Helper Issues
The Facebook Pixel Helper Chrome extension can sometimes be unreliable. It might not always detect the Pixel firing correctly, requiring additional troubleshooting methods.
5. Website Caching or Blocking
Caching mechanisms or ad blockers on your website might prevent the Pixel code from loading properly. Configure your website settings or consider workarounds like server-side tracking.
6. Data Layer Issues
If you're using dynamic data for event parameters, ensure your data layer is set up correctly and passing the necessary information to your GTM tags.
Pro tips to Troubleshoot & Fix it:
- Use the Pixel Helper: The Facebook Pixel Helper Chrome extension can help identify basic errors like incorrect Pixel ID or missing event parameters.
- GTM Preview Mode: Use GTM's preview mode to simulate user behavior and test if the Pixel fires as expected.
- Facebook Event Test Tool: This tool within Events Manager allows you to manually trigger specific events and verify their accurate capture.
- Facebook Documentation: Facebook provides detailed guides and troubleshooting resources to help you resolve common issues.
>>> Read more: Why is My Facebook Pixel Not Working and How to Fix The Issue?
Wrap up
Google Tag Manager is a powerful tool for managing different Pixels on your website, and the Meta pixel is one of the most important ones to include in your GTM setup.
After setting up Facebook Pixel with Google Tag Manager, you can configure the events you want to track and gain valuable insights into visitor behavior, enabling more precise audience targeting and improved ad performance on the Facebook platform.
Deduplication in Facebook Pixel: How to Fix Duplicate Events and Track Data Correctly
Event Match Quality: Definition, Benchmarks & How to Improve It
How to Install Twitter Pixel: Every Method You Should Know

Facebook Ad In Review: How Not To Get Stuck In 2026


