Is TikTok Events API Better Than Pixel? Here’s the Truth
Struggling to track conversions accurately on TikTok Ads? The TikTok Events API gives you a powerful alternative to browser-based pixels by sending data directly from your server to TikTok.
This guide thoroughly explains what the Events API does, how it is similar or different from the old pixel, and how to set it up using the most suitable tools available so that your tracking becomes reliable, privacy-safe, and ready for the future.
Let's get down to it!
What is TikTok Events API?
TikTok Events API lets you send conversion events directly from your website or backend interface into TikTok with no browser or pixel code needed; it is a server-side collection of conversions. This is TikTok's response to increased privacy issues and the idea of cookie-based tracking.
Unlike the browser-based Pixel, it works server-to-server, making tracking more reliable across platforms. But how exactly does it compare to the TikTok Pixel?
TikTok Events API vs TikTok Pixel: What’s the Difference?
If you're wondering which tracking method is right for your brand, it's best to break down the core differences between the TikTok Pixel and Events API.
| Feature | TikTok Pixel | TikTok Events API |
|---|---|---|
| Tracking type | Browser-based (client-side) | Server-side |
| Susceptible to ad blockers? | Yes | No |
| Affected by iOS restrictions | Yes | Much less |
| Setup complexity | Easy (no-code) | Requires developer or app integration |
| Custom event logic | Limited | Highly customizable |
| Offline/CRM event support | No | Yes |
✅ Use TikTok Pixel if you want a quick, no-code setup for a small store and don’t need advanced tracking or developer support.
✅ Use TikTok Events API if you need proper device tracking, support for offline or CRM events, and developer access or app-based integration.
Why Use TikTok Events API for Conversion Tracking?
If you're still depending on TikTok Pixel alone, some of your conversion data can slip through the cracks. Events API helps fill those gaps!
Improved accuracy across devices and browsers
Blocking browser tracking pixels by ad-blockers, browser preferences, privacy updates, etc., from version iOS 14 and above leads to a loss of conversion reporting in some cases. Therefore, it’s not available to guarantee end-user tracking.
However, with the Events API, even data collection at the server end is not vulnerable to these effects. It gives complete and accurate data with fewer blind spots for better optimization decisions.
Greater flexibility with what you can track
With Events API, you can track not only the events happening in the browser window, but you can also fire conversion events from CRM or an app, or track offline stuff.
This will really help businesses that are based on headless conventions or multi-touch attribution models. You're not restricted to browser-driven logic; it opens even further possibilities for tracking.
Better optimization and data control
Event sending via API is fully customizable by dynamic values, parameters, and hashed user data.
This kind of puts you in charge of what is sent to TikTok for learning purposes. More relevant signals can improve ad delivery, strong targeting, and lower CPAs over time.
TikTok Enhanced Events API
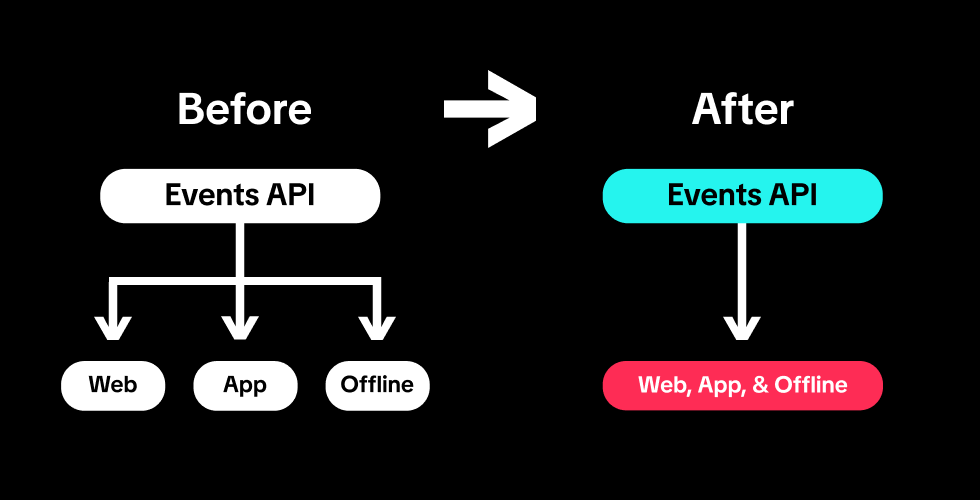
TikTok recently introduced the Enhanced Events API, combining the previously separate Web, App, and Offline endpoints into a single, unified endpoint. This simplifies how businesses send conversion events, cutting down development time while improving cross-platform accuracy.
If you are starting a new integration today, TikTok would recommend you go with this updated version. This version allows a robust and flexible event tracking solution, especially when you aggregate the inputs of this data by website, CRM, or mobile application.
So, what is different? Here’s a fast comparison of the two:
| Feature | Old Events API | Enhanced Events API (New) |
|---|---|---|
| Number of Endpoints | 3 (Web, App, Offline) | 1 unified endpoint |
| Integration Complexity | Higher – separate setup per channel | Lower – one setup for all |
| Flexibility | Limited to source type | Supports mixed sources (e.g., CRM + Web) |
| Recommended for New Setups | ❌ | ✅ |
This new version also supports all existing event parameters and logic, so it’s backward-compatible. If you’re using a Shopify app like Omega – TikTok Multi Pixels, you’re likely already benefiting from this unified structure without any manual setup.
How to Set Up TikTok Events API
Setting up the Events API can look different depending on your platform. Below are two common setups: one for Shopify users using a third-party app, and one for custom-coded websites.
For Shopify (with app integration)
This is the easiest and most user-friendly option. With the help of a Shopify app, you can set up the TikTok Events API to track server-side conversions accurately without writing a single line of code.
Step 1: Install a compatible app such as Omega – TikTok Multi Pixels
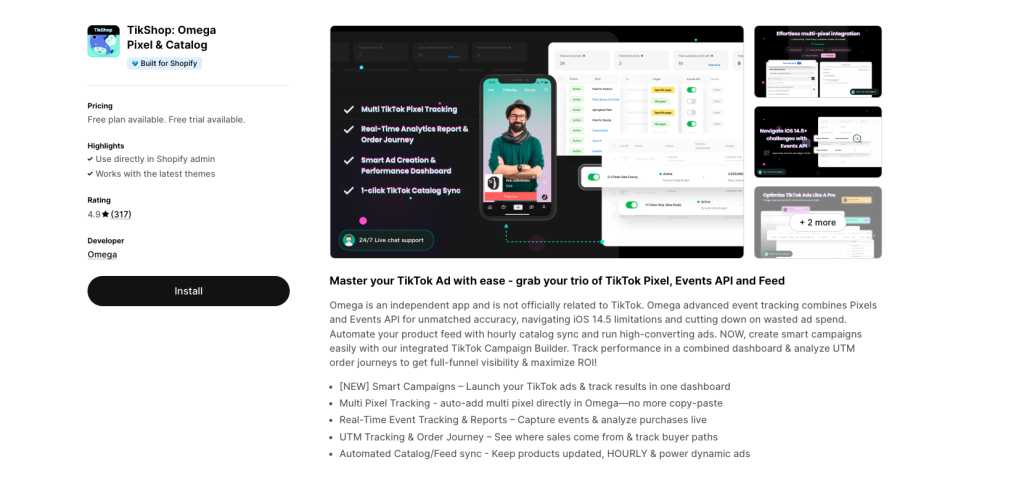
Step 2: After launching the app, connect your TikTok For Business account to get started.
Then, simply select the Ad account you want to use and choose the Pixel you’d like to connect. The app will automatically attach it to your store, no manual setup needed.
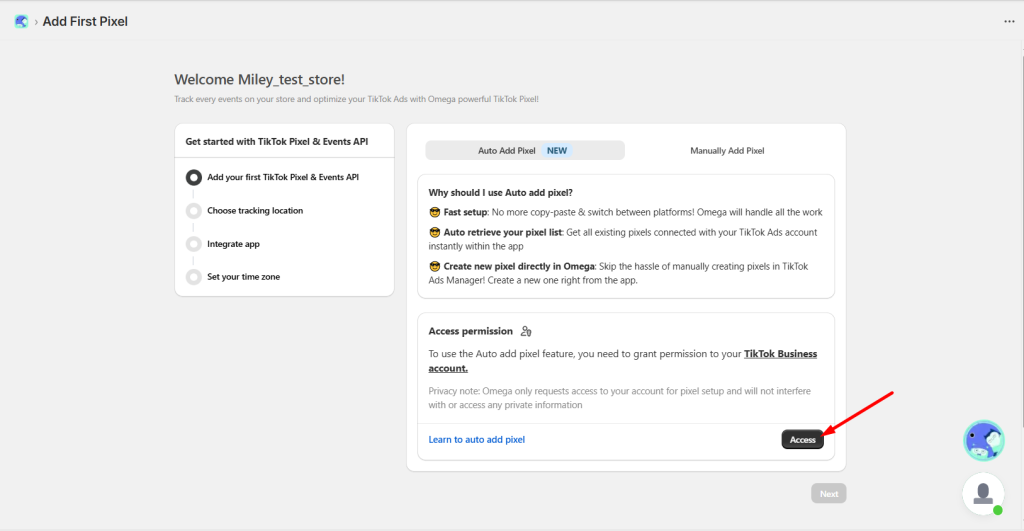
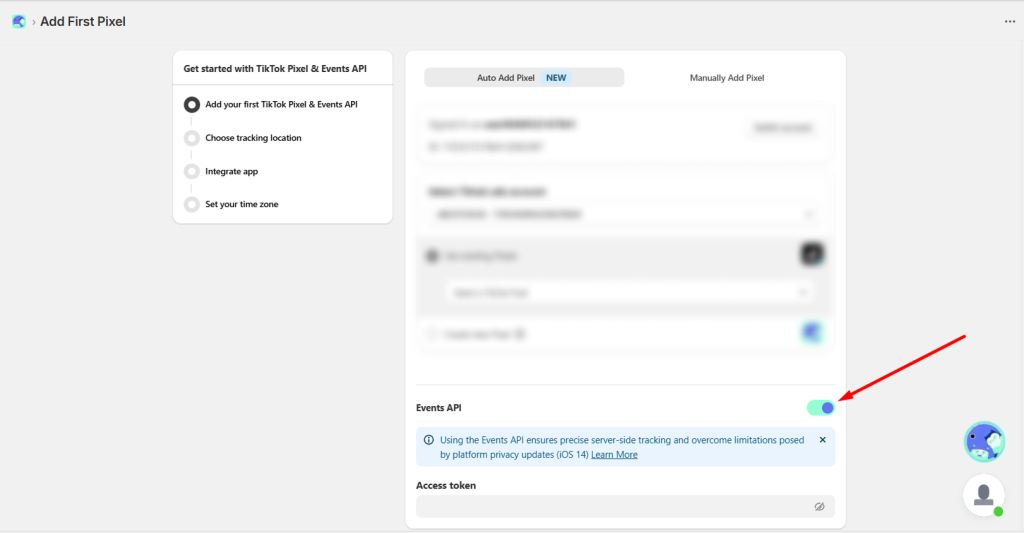
Step 3: Enable server-side or “Events API”.
Step 4: Once your TikTok Pixel and Events API are fully set up, you can test event tracking directly inside the app.
- Go to TikTok Pixel Manager, select the pixel you want to test.
- In TikTok Events Manager, navigate to the Test Events tab and get your Test Code.
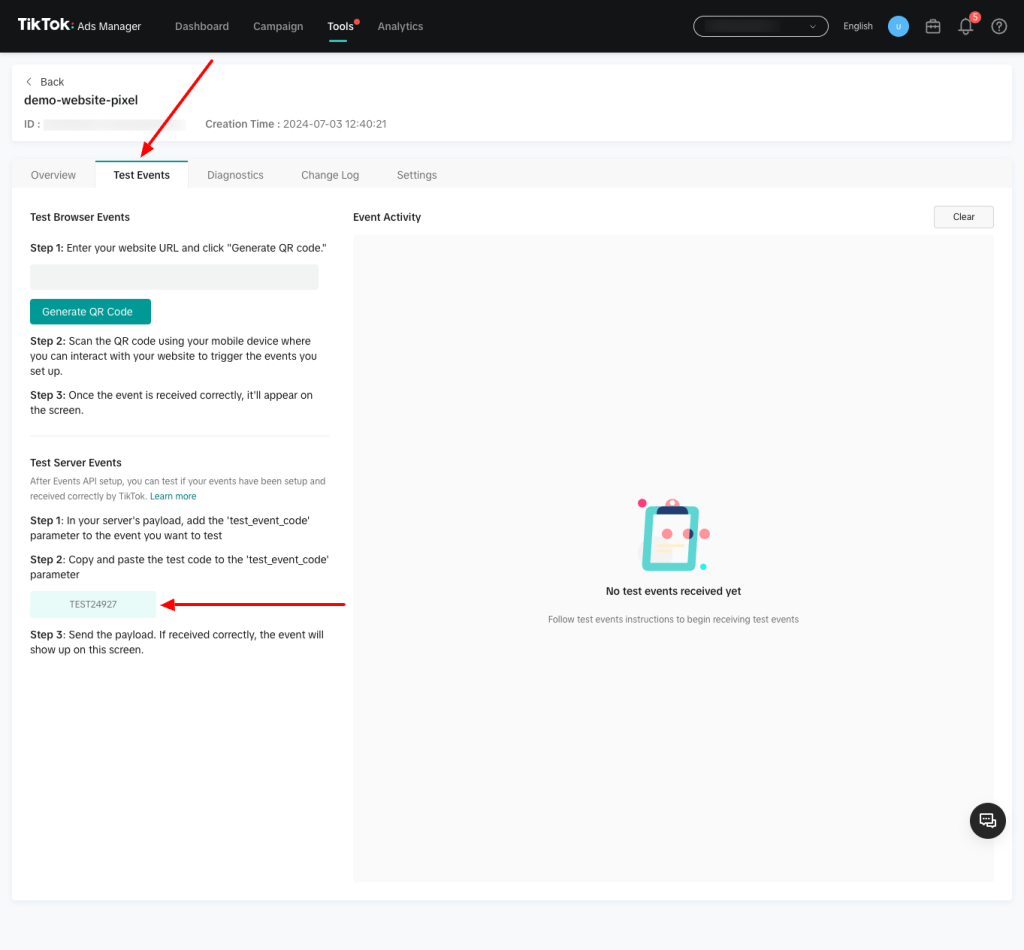
- Enter this code into the app’s test section, then browse your store to trigger test events.
These apps remove the need for coding and offer extra features like deduplication, event enrichment, and real-time logs.
For custom websites or headless stores
This method is more technical but gives you full control over your event logic, formatting, and triggers.
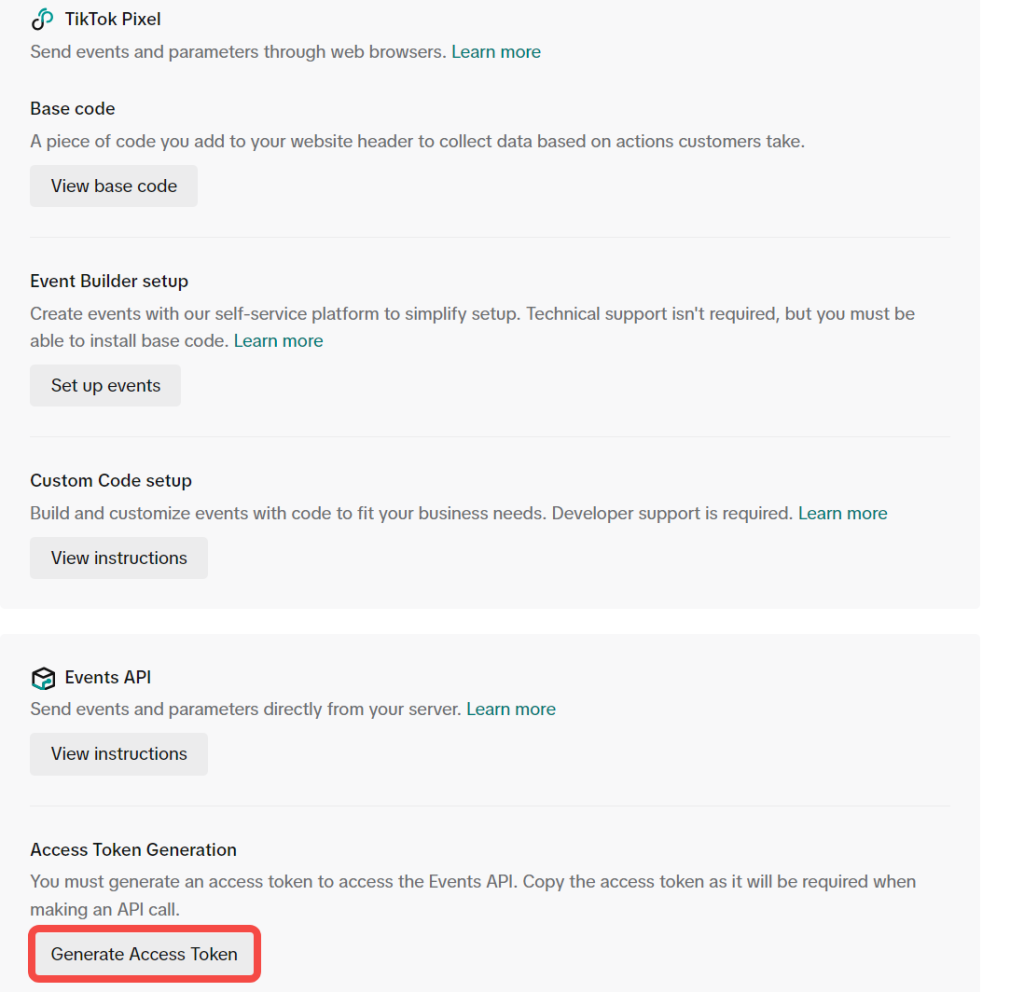
Step 1: In TikTok Ads Manager, go to Assets > Events.

Then choose Events API and create a new Pixel.
Step 2: TikTok will generate an access token and API endpoint URL, you’ll use these to authenticate your server requests.
Step 3: Work with a developer to format HTTP POST requests to TikTok’s endpoint, including required parameters like event_type, timestamp, user_data, and properties.
Step 4: Ensure you hash personal info (like email or phone) using SHA-256 before sending.
Step 5: Use the “Test Events” tool to simulate events and debug any errors.
If you’re using a headless storefront or want to track CRM-based conversions, this setup gives you the most flexibility and precision.
Which one’s right for you?
| Setup Type | Omega – TikTok Multi Pixels (Shopify App) | Custom Website Integration |
|---|---|---|
| Coding required | 🧩 No – plug-and-play | 👨💻 Yes – needs developer support |
| Setup time | ⚡ Fast – under 3 minutes | ⏳ Medium to high – depends on complexity |
| Accuracy | ✅ High – built-in deduplication + real-time syncing | ✅ High – but needs proper event formatting |
| Control & flexibility | 🟡 Moderate – app handles most logic | 🟢 Full control – customize everything |
| Use case | Ideal for most Shopify stores | Ideal for headless builds, custom flows, or CRMs |
Best Practices for TikTok Conversion Tracking
Setting up the TikTok Events API is just the start; getting the best out of it would require quality data with a consistent structure, as well as smart implementation. Here are some tips to make your tracking setup as accurate and effective as possible.
1. Deduplicate events properly
While sending data through the Pixel and Events API, TikTok may get duplicate signals for the same conversion. If that is not cleaned, it shortens the validity of the results and confuses the reporting.
To handle this, each event must include a unique event ID so TikTok can match and merge them correctly. If you’re using the Omega TikTok Pixels, event_id is automatically included in both browser and server events, and deduplication is handled for you, no manual setup needed.
2. Hash user data before sending
TikTok requires the hashing of personal data such as email and phone numbers for privacy. Real values can lead to rejection or neglect of your events.
User identifiers should always be hashed using SHA-256 before being sent via the API. Check that fields such as email, phone_number, or external_id are both clean and hashed on your server.
3. Map events to funnel stages
To furnish TikTok's algorithm with better optimization opportunities, you need to track more than just the purchase event. You should track events like ViewContent, AddToCart, InitiateCheckout, and Purchase.
By tracking the whole journey, you can see where users drop out and will allow TikTok to deliver ads to people who are likely to complete not just the last step but another step in the funnel.
4. Test everything before scaling
Even if your setup looks perfect on paper, things can surely still go wrong when it comes to real implementation; hence, testing is not an option.
Use TikTok “Test Events” to simulate real events and check their receipt. Address problems like wrong parameters being passed, invalid hashes, or missing fields before scaling your campaigns.
Common Mistakes and How to Avoid Them
Even equipped with all the right tools, it is easy to misconfigure your TikTok Events API. Here are some of the most common mistakes breaking your tracking, before they actually bite in the conversion.
Forgetting to deduplicate Pixel and API events
If you are working with both TikTok Pixel and Events API, you have to ensure any duplicate reporting to avoid overassigning conversions by TikTok.
Every event you send should get a unique event_id with both the Pixel and API versions sending the same ID for TikTok to understand it's the same action back and forth.
Sending unhashed or improperly hashed user data
TikTok requires personal identification information to be hashed using SHA-256. If it is not there or not hashed properly, the event might just be ignored.
Always hash emails, phone numbers, and external IDs on your server before sending. Validate the formatting to ensure TikTok can match the data.
Using unsupported or incomplete event parameters
Sending an event lacking any, or with inadequate, parameters can lead to TikTok rejecting the event completely, leaving gaps in your reporting.
Always stick closely to TikTok API documentation, including all required fields: event_type, timestamp, and properly formatted user_data.
Conclusion
If you want to accurately track conversions and stay one step ahead of the browser limitations and privacy changes, you must go with the TikTok Events API. It is emerging as the advertisement solution of choice amongst all modern advertisers for providing more control, greater data quality, and catering to complex use cases.
For Shopify users, integrating the server-side tracking using the app Omega – TikTok Multi Pixels makes it easier than ever. It is a plug-and-play solution that makes advanced tracking accessible without coding.

Omega TikTok Pixel: New Conversion Analytics is here
Top TikTok Apps for Shopify Could Double Your Conversions
Deduplication in Facebook Pixel: How to Fix Duplicate Events and Track Data Correctly
Omega TikTok Pixels Now Speaks Your Language: Introducing Multi-Language Support
Top TikTok Apps for Shopify Could Double Your Conversions
Deduplication in Facebook Pixel: How to Fix Duplicate Events and Track Data Correctly
Omega TikTok Pixels Now Speaks Your Language: Introducing Multi-Language Support

Trakpilot New Feature: Export Your Conversion Events Data
Shopify Analytics Discrepancies: What’s Actually Happening?
Top TikTok Apps for Shopify Could Double Your Conversions
Deduplication in Facebook Pixel: How to Fix Duplicate Events and Track Data Correctly
Omega TikTok Pixels Now Speaks Your Language: Introducing Multi-Language Support
Trakpilot New Feature: Export Your Conversion Events Data